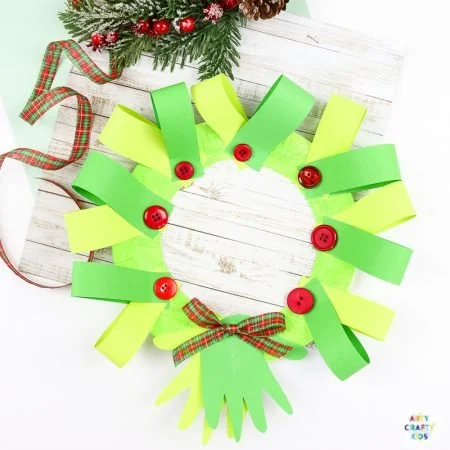
The Paper Plate Handprint Christmas Wreath is a delightful and easy DIY project that can bring joy during the festive season. This craft utilizes simple materials that you might already have at home, making it a budget-friendly option for holiday decorations. Ideal for families and beginner crafters, this easy craft allows you to create a beautiful decoration to hang during Christmas or give as a handmade gift. In this article, we’ll guide you through how to make this charming wreath step by step, ensuring you have a wonderful crafting experience.
WHY YOU WILL LOVE THIS Paper Plate Handprint Christmas Wreath
Making a Paper Plate Handprint Christmas Wreath is not just fun, but it’s also a highly rewarding activity that comes with numerous benefits:
- Easy for Beginners: This project is perfect for those new to crafting. The simple steps ensure everyone can participate, regardless of skill level.
- Uses Simple Materials: Most of the required materials are common household items, making it easy to gather what you need.
- Budget-Friendly: Crafting doesn’t have to be expensive. This project uses inexpensive supplies.
- Quick to Make: You can complete this wreath in a relatively short time, making it a great last-minute craft.
- Great for Home Decor: Hang your finished wreath on your front door or inside your home for a festive touch.
- Perfect for Gifts: This craft serves as a lovely handmade gift for family and friends.
- Ideal for Seasonal Decorating: Get into the holiday spirit with this cheerful, seasonal decor item.
- Easy to Customize: Feel free to make adjustments based on your style or preferences.
PROJECT DETAILS
Skill Level
This project is beginner-friendly, making it suitable for all ages, including kids with adult supervision.
Estimated Time
You can expect to spend about 1-2 hours on this craft project from start to finish.
Approximate Cost
The total cost is very low, under $10, especially if you have most materials at home.
Best For
This project is perfect for holiday decorations and can be an enjoyable family activity.
Project Type
This is a no-sew craft, making it easy to complete without complex techniques.
TOOLS AND EQUIPMENT NEEDED
Scissors
Used for cutting out the paper and creating the shapes needed for the wreath.
Glue Stick
Essential for attaching pieces together securely, ensuring your wreath stays intact.
Paintbrush (Optional)
If you choose to use a paint rather than a sponge for the green paint, a paintbrush is handy for applying the color evenly.
MATERIALS
Paper Plate
Serves as the base of your wreath. The round shape provides a perfect foundation for your decorative items.
Green Paint
Used to color the paper plate green, creating an authentic wreath look.
Green Construction Paper in Two Shades
These will be used for cutting out handprints and creating holly hearts, adding dimension and color to your wreath.
Red Buttons
These serve as the berries in your holly hearts, giving the wreath a festive touch.
Ribbon
Used to create a bow and hanging loop, adding a finishing touch to your wreath.
Scissors
Necessary for cutting out handprints and the paper strips for the holly hearts.
Glue Stick
Used to adhere all components together, ensuring the wreath is secure and robust.
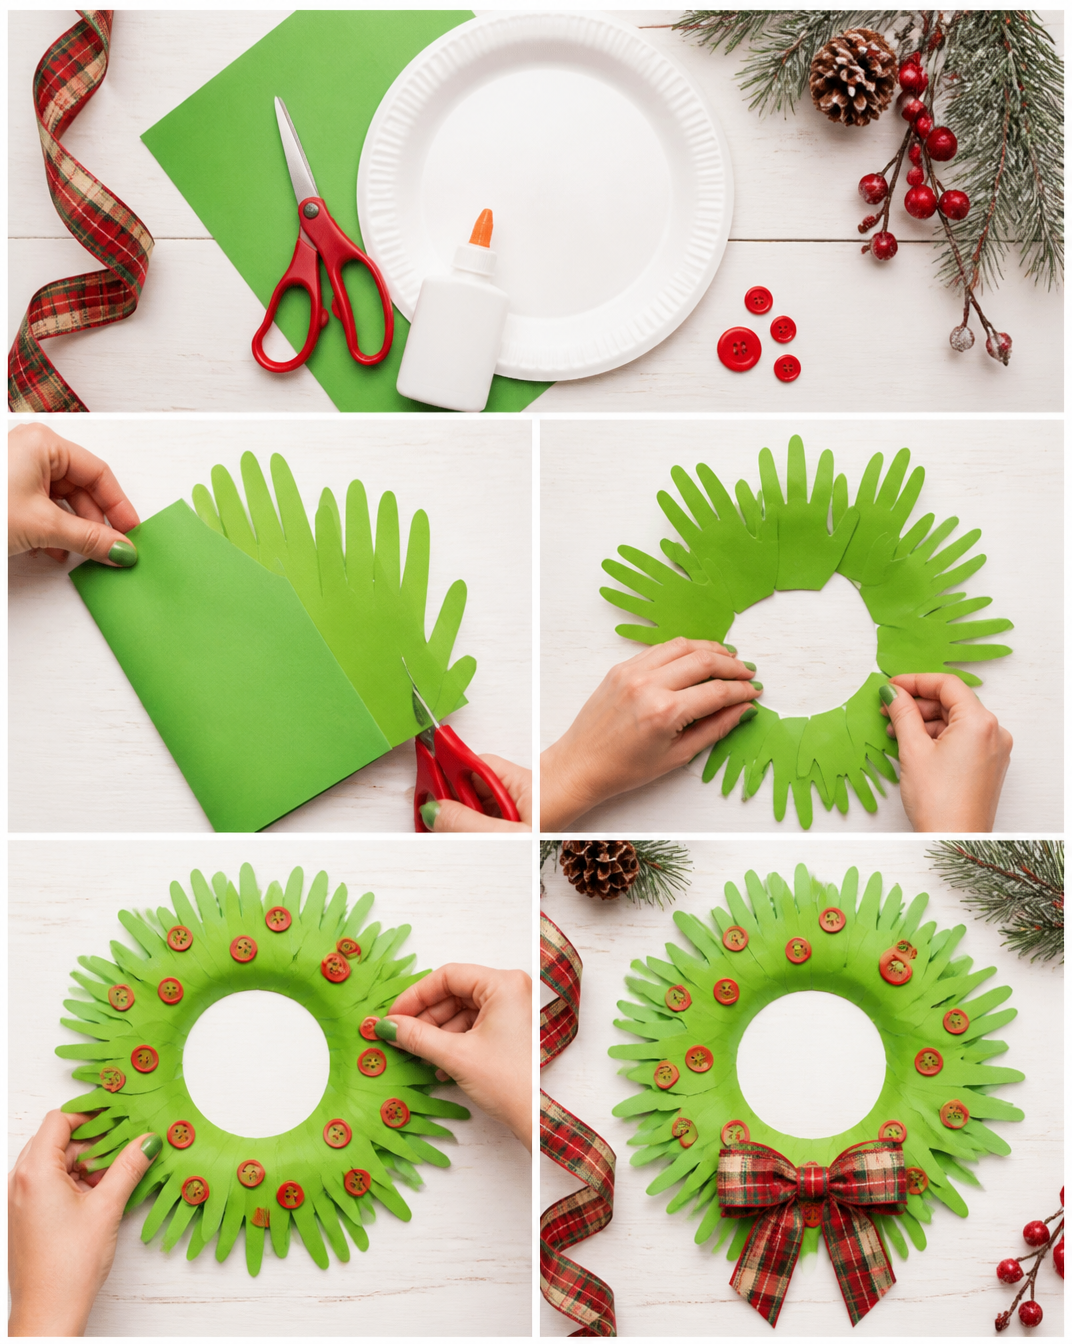
HOW TO MAKE Paper Plate Handprint Christmas Wreath
Step 1: Paint the Paper Plate
Start by painting the front of a paper plate green. This will be the base color of your wreath. Allow the plate to dry completely before moving to the next step.
Step 2: Cut Out the Center
Once the plate is dry, cut a circle in the middle of the plate. To make this easier, you can draw a cross in the center of the plate, cut along these lines, and fold up the segments to create a clear center opening.
Step 3: Cut Green Strips
Cut strips of green construction paper in two shades, each about 2 cm wide. You’ll need around seven strips of each color.
Step 4: Create Holly Hearts
To make holly hearts, align the bottoms of two strips at a 90-degree angle and secure them with glue. Then, fold one strip over the join to create a loop and secure with more glue. Repeat this until you have at least eight holly hearts.
Step 5: Make Handprints
Have children trace their handprints on both shades of green construction paper. Cut them out carefully and set them aside.
Step 6: Secure Handprints
Attach the handprints to the bottom of the painted plate using a glue stick, ensuring they are evenly spaced and create a festive look.
Step 7: Add Ribbon
Cut a piece of ribbon, tie it into a bow, and glue it at the top of the handprints for decoration.
Step 8: Surround with Holly Hearts
Arrange the holly hearts around the handprints and glue them down securely. Fill in any gaps to create a fuller appearance.
Step 9: Add a Loop
Finally, attach a loop of ribbon to the back of the plate for hanging purposes. This way, you can easily hang your wreath on a door or wall.
TIPS AND TRICKS
- Choosing Materials: Opt for vibrant colors that stand out. Using different shades of green creates contrast and adds depth to the wreath.
- Cutting and Gluing: To make cutting easier for kids, guide them through the process. Use a good-quality glue stick for a strong bond.
- Avoiding Common Mistakes: Be patient while letting the paint dry. Rushing this step could cause smudges.
- Making the Project Easier: You can pre-cut shapes if small children are involved, allowing them to focus on gluing and arranging.
- Saving Money: Use scrap paper for practice cuts before using final pieces.
- Making the Craft Last Longer: Consider using clear acrylic spray to seal the paint on the wreath for added durability, if desired.
- Working Safely: Always supervise children when using scissors, and keep them away from sharp edges.
VARIATIONS AND CUSTOMIZATION IDEAS
- Different Colors: Experiment with various colors for the handprints and hollies to match any decor theme or personal preference.
- Larger Wreath: Use a larger paper plate if you want a bigger wreath, or even combine two plates for a fuller appearance.
- Seasonal Versions: Consider making variations for other holidays—transform it into a spring flower wreath or a Halloween-themed craft with different colors.
- Different Materials: Incorporate natural elements, such as faux berries or pinecones instead of buttons, for a more rustic look.
Paper Plate Handprint Christmas Wreath FAQ
Is this project suitable for children?
Yes! This project is great for children with adult supervision, making it a fun family activity.
What materials do I need to complete this wreath?
You will need a paper plate, green paint, green construction papers, red buttons, ribbon, scissors, and a glue stick.
How long does it take to make this craft?
The total crafting time should be around 1-2 hours, depending on how involved you get with decorating.
How do I store my wreath after Christmas?
Store your wreath in a cool, dry place. You can place it flat between sheets of cardboard to avoid bending or damage.
Can I make customized versions of this wreath?
Absolutely! You can alter colors, add different decorations, or increase the size based on your preferences.
CONCLUSION
Creating a Paper Plate Handprint Christmas Wreath is a simple, budget-friendly craft that enhances your holiday decor while providing a creative outlet for families. Ideal for beginners, this easy DIY project offers joy and festivity to any home during the holiday season. We encourage you to give this craft a try—it’s perfect for sharing with loved ones! Don’t forget to share your experience and any customization ideas you come up with. Happy crafting!