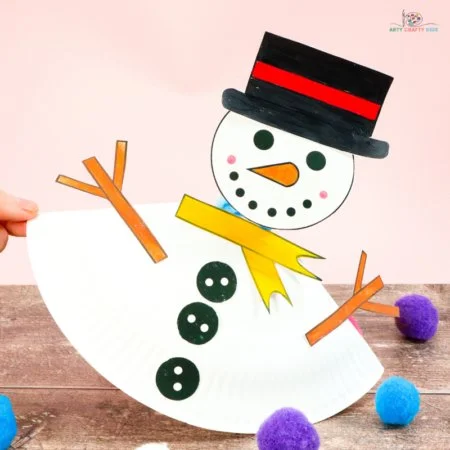
Creating a rocking paper plate snowman is a delightful and easy DIY project that combines fun and creativity. This seasonal craft is perfect for beginners looking to enhance their holiday decor without spending too much. Using simple materials like paper plates and pipe cleaners, you can make charming decorations for your home or thoughtful homemade gifts for loved ones. It’s a budget-friendly DIY you can enjoy any time during winter!
WHY YOU WILL LOVE THIS ROCKING PAPER PLATE SNOWMAN
You will love making this rocking paper plate snowman for several reasons:
- Easy for Beginners: This project is beginner-friendly, making it great for individuals of any age, including kids.
- Uses Simple Materials: The craft uses easily accessible materials, reducing the challenge of finding what you need.
- Budget-Friendly: Most of the materials are inexpensive, making this a great choice for those looking for budget-friendly crafts.
- Quick to Make: You can complete this craft in a short amount of time, perfect for busy schedules.
- Great for Home Decor: This cute snowman will look lovely as part of your winter decorations.
- Great for Gifts: It makes for a charming handmade gift that shows thoughtfulness and effort.
- Easy to Customize: You can personalize your snowman in many ways to fit your style or theme.
PROJECT DETAILS
Skill Level
This craft is suitable for beginners. It features simple instructions and uses easy-to-handle materials.
Estimated Time
The project will take around 30–45 minutes, making it a quick and enjoyable crafting session.
Approximate Cost
The total cost for materials is approximately $5–$10, making it an economical option for a creative DIY project.
Best For
This craft is ideal for kids, families, and anyone interested in seasonal or holiday decorations.
Project Type
This project is a combination of an easy craft and a fun DIY home decor item.
TOOLS AND EQUIPMENT NEEDED
Scissors
Scissors are essential for cutting paper plates and other materials into the desired shapes for your snowman.
Glue Stick
A glue stick will be used for attaching different elements of the snowman.
Stapler
A stapler is necessary to secure the fold in the paper plate, ensuring it keeps its shape.
Sticky Tape
Sticky tape is helpful for attaching the pipe cleaners and any additional decorations securely.
MATERIALS
White Paper Plate
The main body of the snowman will come from a white paper plate. Its round shape is perfect for creating the snowman’s head and body.
Acrylic Paint
Acrylic paint adds personality to your snowman with bright colors. You can choose classic white or any other color to personalize your craft.
Pipe Cleaners (2)
Pipe cleaners are used to create the snowman’s arms and bring a fun, flexible dimension to the project.
Glue Stick
This will be used to attach various components of the snowman, such as the hat and accessories.
Scissors
Scissors are necessary for cutting the paper plate and other decorations as required.
Sticky Tape
Sticky tape helps to secure the parts of the snowman that you wish to fasten temporarily or permanently.
Stapler
A stapler is used to secure the folds in the paper plate, making sure the snowman’s rocky base holds its position.
HOW TO MAKE ROCKING PAPER PLATE SNOWMAN
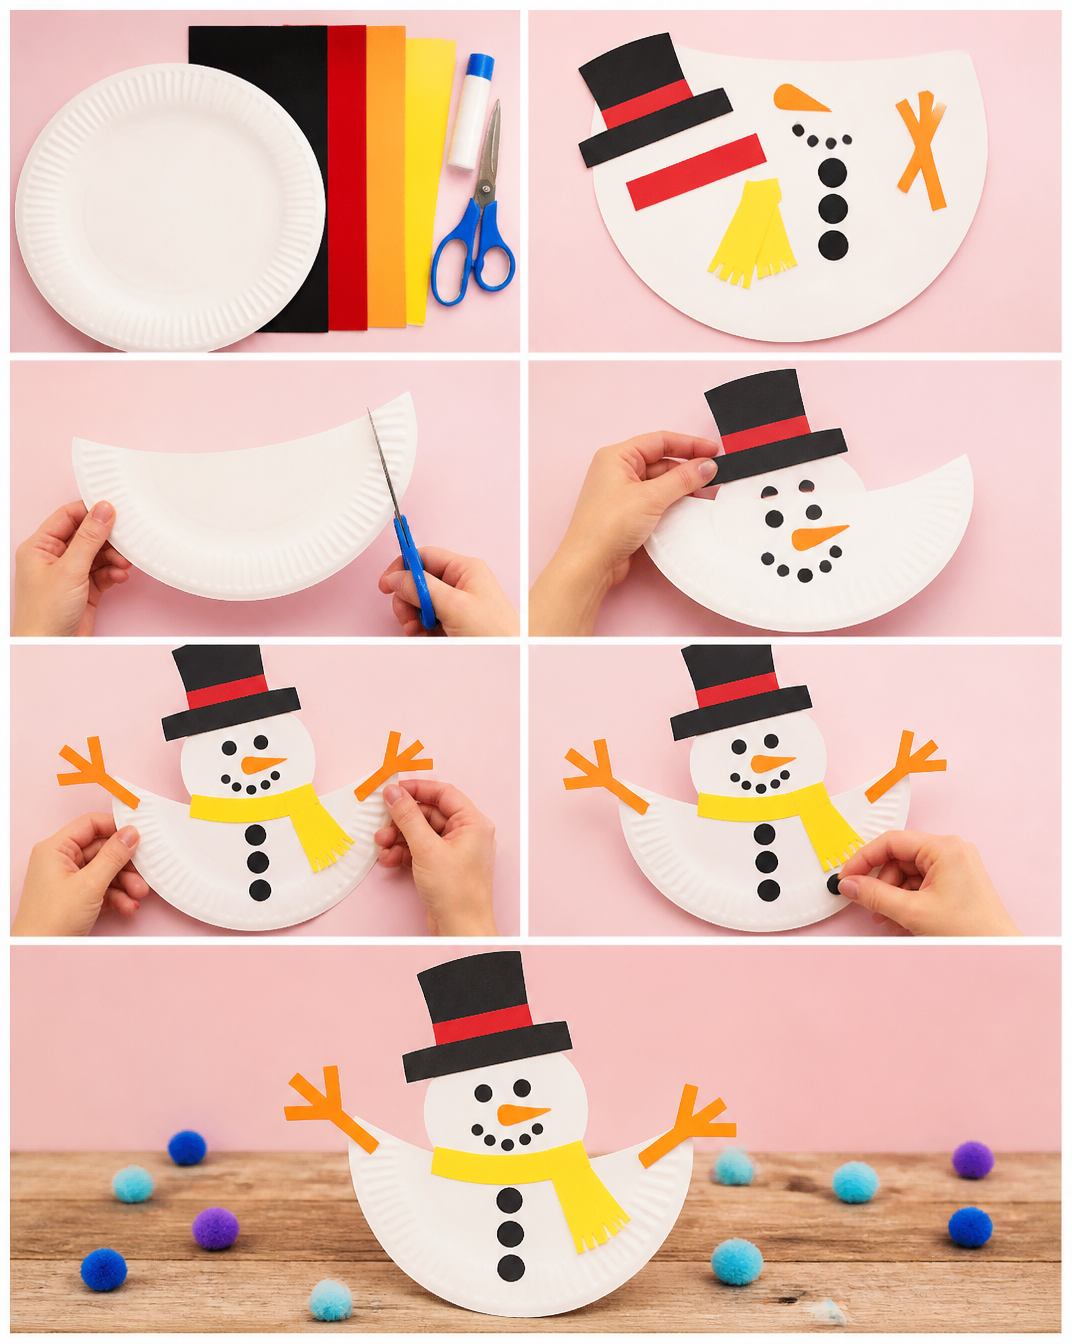
Step 1: Paint the Snowman Template
Begin by painting your white paper plate with acrylic paint. You can use a range of shades for different snowman elements. Let it dry completely before proceeding.
Step 2: Cut the Paper Plate
Once the paint is dry, turn the paper plate over. Cut a straight line just beyond the center point of the plate, creating two sections.
Step 3: Fold the Plate
Gently fold the paper plate to create a noticeable center point. This will give your snowman a rocking motion.
Step 4: Secure the Fold
Use a stapler to secure the fold you created in the previous step. This will help maintain the shape while you add the rest of the elements.
Step 5: Create an Opening
Cut off the tip of the plate to create a small opening at the top. This opening will be crucial for securing the snowman’s head.
Step 6: Prepare the Pipe Cleaners
Twist two pipe cleaners around each other to add thickness. Then, coil them around your fingers to create a spring shape, resembling the snowman’s neck.
Step 7: Insert the Pipe Cleaner
Insert one end of the twisted pipe cleaner into the small opening at the top of the paper plate, ensuring it stays secure with sticky tape.
Step 8: Affix the Hat
Using a glue stick, attach a small hat to the top of the snowman’s head. A cute or quirky hat can give your snowman extra character.
Step 9: Secure the Head
Now, secure the head of the snowman to the top of the pipe cleaner using sticky tape to ensure it stays in place.
Step 10: Complete the Snowman
Finish off by adding facial features with markers or additional paint. Use buttons for decoration, and add a scarf and stick arms made from leftover pipe cleaners.
TIPS AND TRICKS
- Choose Quality Materials: Ensure your scissors can cut through paper easily, and the glue you use is strong enough for holding elements.
- Cut Carefully: When cutting the paper plate, go slow and steady to avoid cutting too much or causing uneven edges.
- Glue Generously: Don’t be afraid to use enough glue to ensure all pieces stay in place. If you’re using a glue stick, make sure to cover larger areas for better adhesion.
- Avoid Common Mistakes: Ensure the fold you create is complete and secure before moving on; otherwise, the snowman may not rock properly.
- Get a Better Finish: If you want a cleaner look, consider painting the edges of the paper plate after cutting to hide any rough edges.
- Save Money: You can often find materials around your home, so check your crafting supplies before purchasing new ones.
- Making the Craft Last Longer: To enhance durability, consider using a layer of mod podge after painting to seal the craft.
- Work Safely: If children are involved, supervise them especially when using scissors and other tools.
VARIATIONS AND CUSTOMIZATION IDEAS
- Different Colors: Paint your snowman in various colors to fit your home decor or personal style.
- Different Sizes: Create mini versions of the snowman using smaller paper plates for a fun family project.
- Use Different Materials: Try using cardboard instead of paper plates for a sturdier version of the snowman.
- Seasonal Versions: Add holiday-specific elements, like Christmas ornaments or Halloween decorations, to personalize your snowman.
- Different Patterns: Create a patterned snowman by using patterned paper plates or adding decorative paper to the body.
- Unique Accessories: Experiment with different accessories like glitter, sequins, or fabric pieces to make your snowman unique.
- Personalized Versions: Draw faces or write names on the snowman to personalize it for gifts or place settings.
ROCKING PAPER PLATE SNOWMAN FAQ
How difficult is this craft?
This craft is beginner-friendly and suitable for all ages. The instructions are straightforward and can be easily followed, even by young children with adult supervision.
What materials do I need?
You will need a white paper plate, acrylic paint, pipe cleaners, a glue stick, scissors, sticky tape, and a stapler. These materials are easily found and budget-friendly.
How long does the craft take?
You can expect to finish this craft in about 30–45 minutes, depending on how elaborate you make your snowman decorations.
Can I store the snowman?
Yes, you can store the snowman in a safe place away from moisture and direct sunlight. It’s best to keep it in a box to avoid damage.
How can I clean the snowman?
If your snowman gets dirty, gently wipe it down with a damp cloth. Avoid soaking it as this may ruin the paper materials.
Is it safe for young children to make?
While the project is safe, adult supervision is recommended, especially when using scissors or hot glue.
Can I customize the snowman?
Absolutely! You can customize colors, designs, and accessories to make the snowman uniquely yours.
CONCLUSION
Making a rocking paper plate snowman is an easy and wonderful way to engage with your creative side. This seasonal craft is perfect for those seeking an enjoyable, budget-friendly DIY project. It is beginner-friendly, allowing anyone to join in the fun of crafting. With simple materials and quick steps, you can create a charming addition to your holiday decor or a thoughtful handmade gift for someone special. So gather your supplies and start crafting today! We’d love to see your finished snowmen and any unique versions you come up with—feel free to share your experiences!