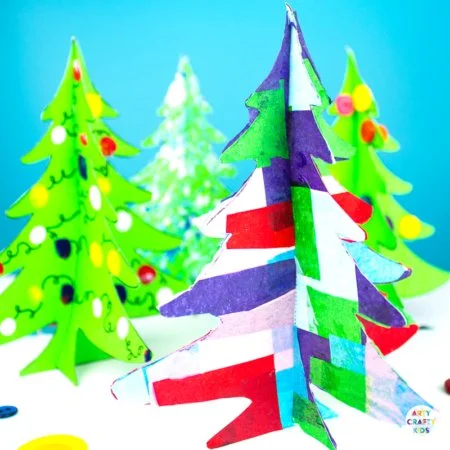
Create a delightful 3D Printable Christmas Tree Craft with Arty Crafty Kids! This easy DIY project is perfect for all skill levels. It’s a great way to engage your creativity and make beautiful holiday decorations, homemade gifts, or even festive party decor. With simple materials and clear instructions, you’ll feel accomplished while crafting this festive seasonal display.
WHY YOU WILL LOVE THIS 3D PRINTABLE CHRISTMAS TREE CRAFT
This 3D Printable Christmas Tree Craft is an ideal DIY project for those looking for an easy craft to get into the holiday spirit. You will appreciate this craft for many reasons:
- Easy for Beginners: The project requires no special skills, making it a perfect entry point for new crafters.
- Uses Simple Materials: Everything you need is easy to find and inexpensive.
- Budget-Friendly: This craft won’t break the bank, as you can create beautiful decorations without spending much.
- Quick to Make: You can complete it in a short time, making it perfect for those last-minute decorations.
- Great for Home Decor: These 3D Christmas trees will add a cheerful touch to your home.
- Perfect for Gifts: Hand these trees out to friends and family as a unique handmade gift.
- Customizable: You can easily personalize your trees in many ways to match your style.
This project truly embodies the spirit of creative DIY ideas, and it’s a fantastic way to spend an afternoon with family or friends.
PROJECT DETAILS
Skill Level
Beginner-friendly. This craft is simple enough for anyone to try, making it great for kids and adults.
Estimated Time
About 1-2 hours, including drying time.
Approximate Cost
Expect to spend around $10 or less, depending on the materials you have on hand.
Best For
This craft is perfect for family activities, school projects, or as a lovely addition to your holiday celebrations.
Project Type
A seasonal craft great for decorating your home or as a unique handmade gift.
TOOLS AND EQUIPMENT NEEDED
Scissors
Scissors are essential for cutting the template and any other decorations you might want to add.
PVA Glue or Glue Stick
This will help you attach the various decorative elements to your 3D trees. It dries clear, ensuring your work looks neat.
Printer
You’ll need a printer to print the Christmas tree template.
MATERIALS
Green or White Card Stock
Use card stock to create a sturdy base for your trees. Green mimics a real pine tree, while white can give a snow-covered look.
Assortment of Loose Parts
Items like buttons, sequins, or other small decorative pieces can add charm and uniqueness to your trees.
Tissue Paper (Optional)
Tissue paper helps in creating a colorful texture on the trees if you choose not to paint.
Paint (Optional)
If you desire a more colorful approach, using paint can enhance your design and make your craft stand out.
Scissors
As mentioned, scissors are crucial for cutting out your trees and decorations.
PVA Glue or Glue Stick
This adhesive will help secure your decorations in place effectively.
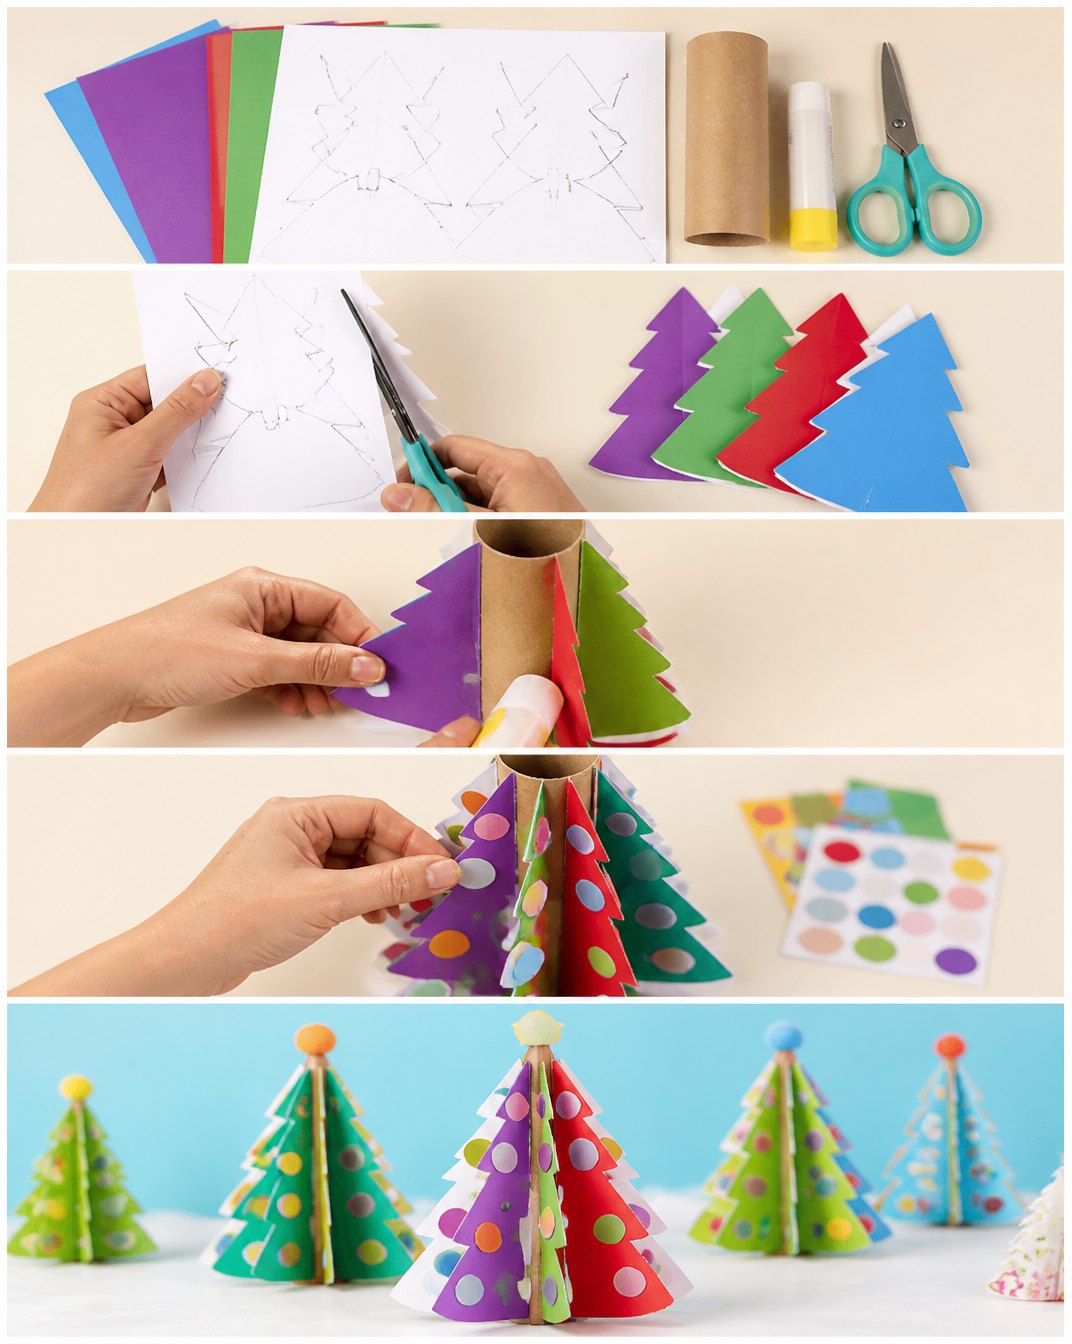
HOW TO MAKE 3D PRINTABLE CHRISTMAS TREE CRAFT
Step 1: Download and Print the Template
Start by downloading and printing the Christmas tree template onto your chosen card stock. You can print it in green for a classic look, or white if you plan to decorate it in other ways.
Step 2: Decorate the Trees
Take your tissue paper (if using) and cut it into small squares. Spread a thin layer of PVA glue over the tree template’s surface. Place the tissue paper squares on top, covering the glue completely. Feel free to layer the colors and create designs as you go.
Step 3: Layer and Secure
After filling one side, apply a thin layer of glue over the tissue paper squares to secure them in place. Allow this side to dry completely before flipping the tree to repeat the process on the other side.
Step 4: Cut Out the Trees
Once both sides are completely dry, carefully cut out the trees along the dotted lines. This step is where the craft starts to take shape, so take your time for clean cuts.
Step 5: Additional Decorations
Using fingerprints, squiggly lines, or additional adornments like paint and buttons, feel free to get creative! Personalize each tree to make it truly unique.
Step 6: Assemble if Needed
After all decorations are complete and dry, you might be able to stand the trees as they are. If they need support, consider using additional card stock to create bases.
TIPS AND TRICKS
- Choosing Materials: Stick to card stock for sturdy trees. You can recycle old cards or paper for an eco-friendly approach.
- Cutting: Use sharp scissors for clean edges. Slow cuts prevent any accidents and mistakes.
- Gluing: Apply glue lightly to avoid messes. Less is often more when it comes to adhesive.
- Make it Easier: If you’re uncomfortable cutting intricate designs, leave the edges simple.
- Get a Better Finish: Ensure all glue is dry before moving or displaying your trees to maintain their shape and design.
- Save Money: Use what you have at home before purchasing new materials—we love upcycled crafts!
- Make Your Craft Last Longer: Store finished decorations in a dry, safe place away from direct sunlight to prevent fading.
- Work Safely: Be cautious with scissors and glue; working on a stable surface helps reduce accidents.
VARIATIONS AND CUSTOMIZATION IDEAS
- Different Colors: Try using blue card stock for a winter wonderland tree or traditional colors like gold and red for a classic Christmas decoration.
- Different Sizes: Scale up or down the template for a variety of tree sizes to create a forest effect.
- Use Different Materials: Experiment with felt, fabric, or even metal for a varied texture.
- Seasonal Versions: Adapt the craft for other seasons by changing colors and decorations.
- Different Patterns: Use patterned paper or draw your designs to create themed trees.
- Add Personal Touches: Have kids decorate their trees with drawings or their names for a personal flair.
3D PRINTABLE CHRISTMAS TREE CRAFT FAQ
1. How difficult is this craft?
This DIY project is easy and beginner-friendly. It’s perfect for crafters of all skill levels.
2. What materials do I need?
You primarily need card stock, PVA glue or a glue stick, scissors, and optional decorative elements like buttons or tissue paper.
3. How long does it take to complete?
The craft generally takes about 1-2 hours to finish, depending on your decorating speed and drying times.
4. How should I store my finished trees?
Store your 3D trees in a dry place, away from sunlight, to help them maintain their shape and keep colors vibrant.
5. Can I customize the trees?
Yes! You can change colors, patterns, sizes, and decorations to make each tree unique.
CONCLUSION
Creating a 3D Printable Christmas Tree Craft is an easy and fun way to celebrate the holidays. This beginner-friendly craft uses simple materials to make stunning decorations or unique handmade gifts. You can customize it to fit any style or season, making it a versatile addition to your DIY home decor.
Try this project today, and don’t forget to share your experience or any creative variations you come up with! Happy crafting!