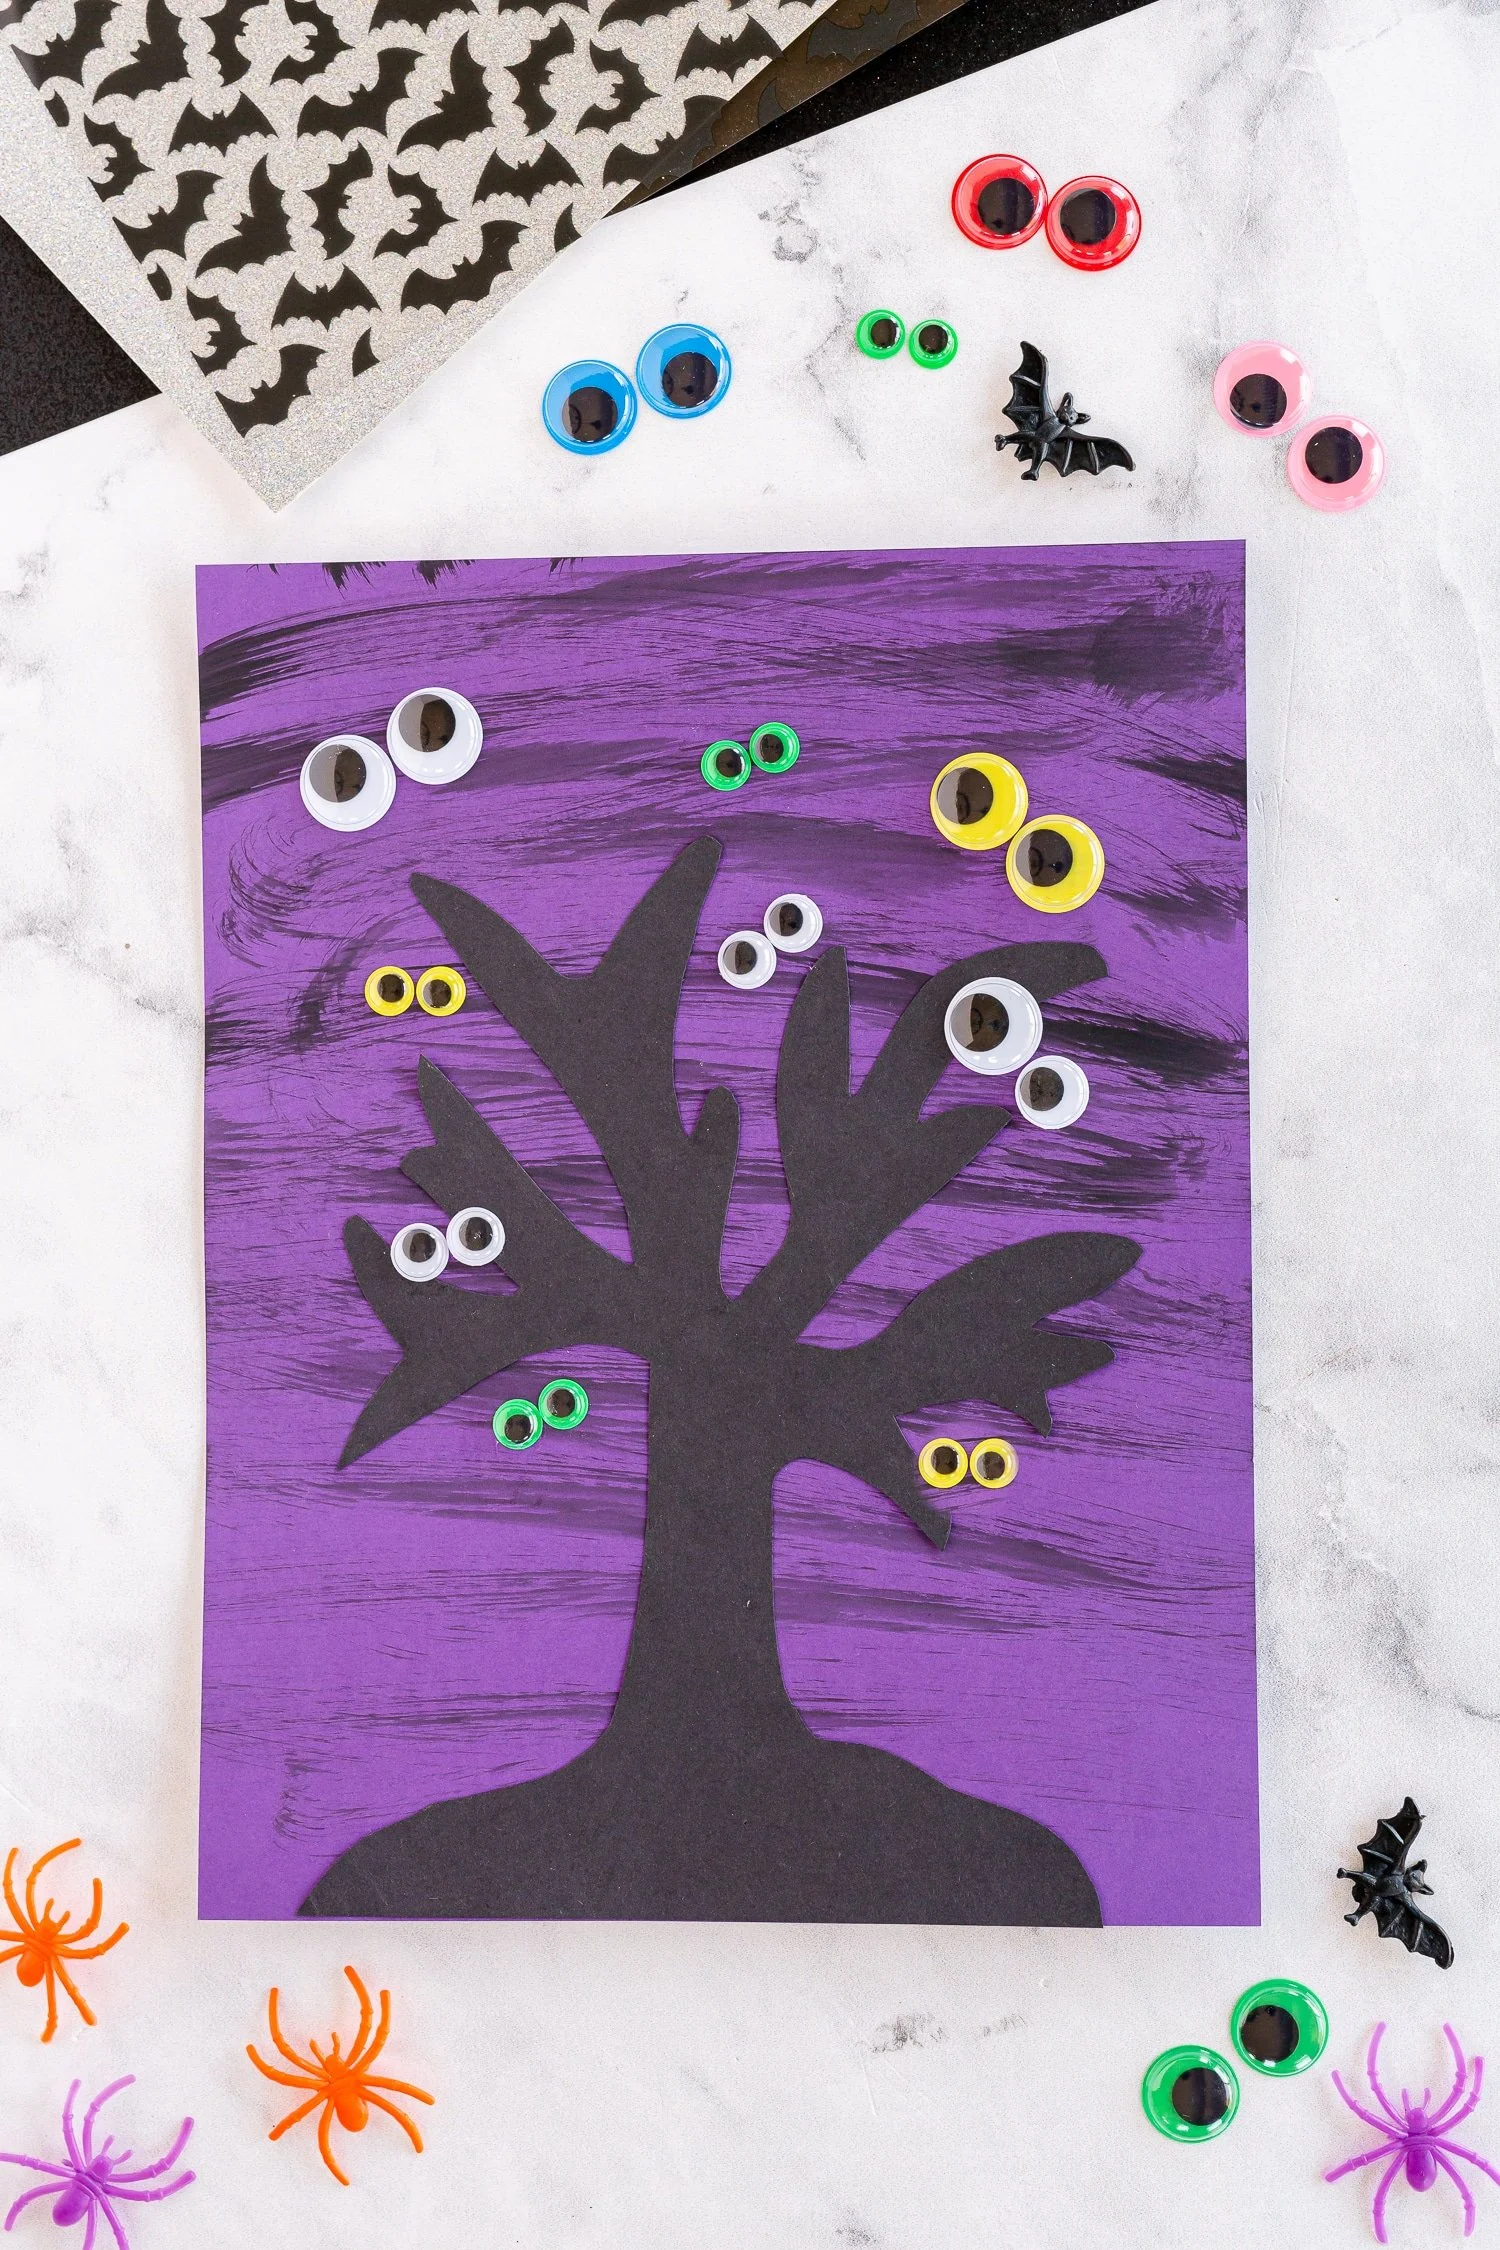
Welcome to this delightful Spooky Halloween Tree Craft! This project is an excellent easy DIY craft idea that can add a fun touch to your Halloween decorations. The spooky tree you will create is perfect for your home decor, Halloween parties, or as a handmade gift. Plus, this craft is beginner-friendly, utilizes budget-friendly materials, and is quick to make. Let’s dive in and explore how to make this festive decoration!
WHY YOU WILL LOVE THIS Spooky Halloween Tree Craft
You will enjoy making this Spooky Halloween Tree Craft for several reasons:
- Easy for Beginners: This craft uses simple techniques that anyone can follow, making it a great choice for newcomers to DIY projects.
- Uses Simple Materials: The materials needed are easy to find and inexpensive, making this a budget-friendly craft.
- Quick to Make: You don’t need to set aside hours to complete this project. It can be done in under an hour, giving you more time to enjoy the spooky season.
- Great for Home Decor: The finished spooky tree can serve as a charming decoration for your home during Halloween.
- Great for Gifts: This handmade craft is also a unique gift idea, perfect for friends or family who love festive decorations.
- Easy to Customize: You can easily modify the design to fit your personal style or seasonal themes, making it a versatile addition to your crafting repertoire.
PROJECT DETAILS
Skill Level
Beginner: This craft is straightforward and doesn’t require any special skills, making it a perfect option for those new to crafting.
Estimated Time
Approximately 30-45 minutes: This quick DIY project can be completed in less than an hour, including drying time.
Approximate Cost
Low: The materials needed are budget-friendly and can often be found around your home or at a craft store for a small price.
Best For
Home decor, gifts, parties: This craft is ideal for creating a spooky atmosphere for Halloween or giving as a handmade gift.
Project Type
Seasonal craft: The Spooky Halloween Tree Craft is a fantastic way to celebrate the Halloween season, offering fun and creativity.
TOOLS AND EQUIPMENT NEEDED
Scissors
Used for cutting out the tree silhouette from the black cardstock. Make sure to use a sharp pair of scissors for clean edges.
Paint Brush
Used for applying paint to the purple paper. A medium-sized brush works best for even coverage.
MATERIALS
Spooky Tree Template
This template is essential for tracing the outline of the tree onto black cardstock. You can either print one from an online source or create your own.
Black Cardstock
This sturdy paper is perfect for creating the spooky tree silhouette. It provides a solid foundation and adds character to your craft.
White or Graphite Pencil
Used for tracing the spooky tree template onto the black cardstock. Make sure to use a pencil that shows well on dark paper.
Black Paint
You will thin this paint with water for creating the spooky sky on the purple paper. Use acrylic paint for the best results.
Water
Used to dilute the black paint to achieve the desired consistency for painting the sky.
Paper Towel
This is handy for cleaning up any spills or excess paint during the crafting process.
Purple Paper or Purple Cardstock
This will serve as the backdrop for your spooky tree. Choose a vibrant shade of purple to contrast with the black tree.
Glue
Used to adhere the components of the craft together, including the tree to the purple paper and the googly eyes to the final piece.
Googly Eyes
These fun eyes will add character to your spooky tree. You can choose different colors like white, green, or yellow for a playful effect.
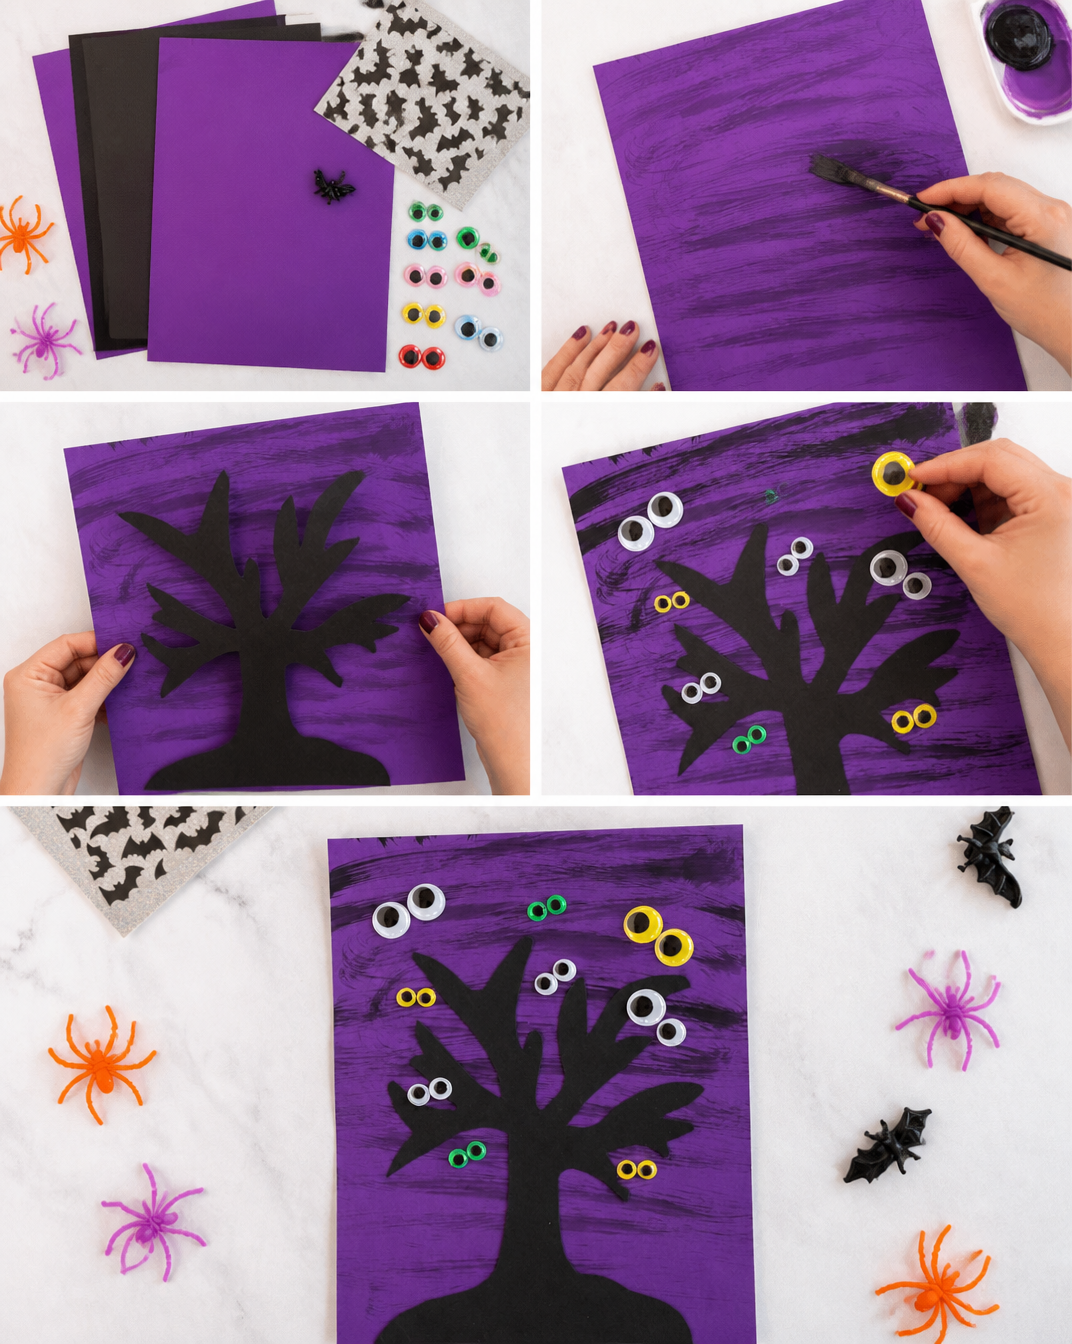
HOW TO MAKE Spooky Halloween Tree Craft
Follow these simple steps to create your own Spooky Halloween Tree Craft. This easy craft is perfect for getting into the Halloween spirit!
Step 1: Print and Prepare the Template
Start by printing out your spooky tree template. This will be your guide for tracing the tree silhouette.
Step 2: Trace the Tree Silhouette
Using the white or graphite pencil, trace the outline of the spooky tree on the black cardstock. Make sure to press lightly so you can easily erase any stray lines later.
Step 3: Cut Out the Silhouette
Carefully cut out the traced tree shape using scissors. Take your time to ensure neat edges. This will be the centerpiece of your Halloween decoration.
Step 4: Prepare the Purple Background
Take your purple paper and set it aside. In a small bowl, mix black paint with water to thin it out. You want it to be liquid but still pigmented enough to create a spooky sky.
Step 5: Paint the Sky
Using a paintbrush, apply the thinned black paint onto the purple paper. You can create a gradient effect by adding more water for lighter areas. Allow the painted background to dry completely.
Step 6: Attach the Tree
Once the purple paper is dry, use glue to attach your black tree silhouette in the center. Press down firmly to ensure it sticks well.
Step 7: Add Googly Eyes
Finally, take your googly eyes and glue them onto the tree and around the sky. Place them randomly to create a fun and spooky look.
Step 8: Let Everything Dry
Allow your finished spooky tree craft to dry completely before displaying it or giving it as a gift.
TIPS AND TRICKS
- Choosing Materials: Look for sturdy black cardstock for the best silhouette effect. You can use construction paper, but cardstock holds its shape better.
- Cutting: When cutting out the tree shape, go slowly for smoother edges. Consider using a craft knife for intricate parts.
- Gluing: Make sure to use a good amount of glue but avoid overdoing it, or it may seep out when pressing the pieces together.
- Painting: For a better finish, try layering paint. Lightly brush on several thin coats rather than one thick coat.
- Choosing Colors: Don’t hesitate to try different colors for the background or googly eyes. Think outside the box with seasonal colors or metallics!
- Safety: If you’re working with children, supervise them during the cutting and gluing phases, especially using scissors.
VARIATIONS AND CUSTOMIZATION IDEAS
- Different Colors: Instead of purple paper, try orange or green to match other Halloween decor.
- Different Sizes: Make smaller or larger versions of the tree for varied decorations or to create a spooky forest effect.
- Seasonal Versions: Change the googly eyes to seasonal motifs, like pumpkins or ghosts, for other holidays like Thanksgiving or autumn.
- Different Materials: Experiment with glitter cardstock for the tree silhouette for added sparkle or textures for the background.
- Personalized Versions: Add names or messages to the spooky tree to create a unique gift for friends and family.
Spooky Halloween Tree Craft FAQ
How difficult is this project for beginners?
The Spooky Halloween Tree Craft is beginner-friendly and designed to be easy for newcomers. With minimal skills required, anyone can successfully complete it.
What materials do I need, and can I substitute any?
You will need black cardstock, purple paper, black paint, and googly eyes. Feel free to substitute materials based on availability, such as using other types of paper or paint colors.
How do I store the finished craft? Will it hold up over time?
Store your completed craft in a cool, dry place. If made with durable materials, it can last for several years, making it perfect for seasonal decorations.
Is this project safe for children?
Yes, but ensure adult supervision while using scissors and glue. Choose non-toxic materials for extra safety, especially for younger crafters.
How long does it typically take to make this craft?
The entire process should take about 30-45 minutes from start to finish, including drying time for the paint and glue.
CONCLUSION
Creating a Spooky Halloween Tree Craft is an easy and fun way to embrace the Halloween spirit. This beginner-friendly project uses simple materials and provides opportunities for creativity and personalization. It’s a budget-friendly DIY project that makes an excellent decoration for your home or a delightful handmade gift. Try it out and share your experience or customization ideas with others! Happy crafting!