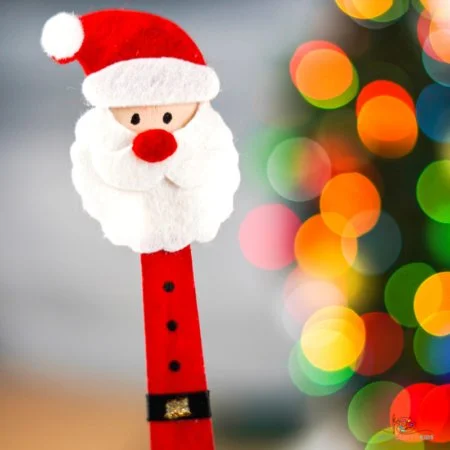
The Popsicle Stick Santa Craft is a wonderful way to embrace the festive spirit while engaging in an easy DIY project. This fun and creative craft idea is perfect for both kids and adults, making it a great choice for holiday decorating. Using simple materials that are often found at home, this beginner-friendly craft will not only brighten your home with homemade decor but also serve as an excellent gift or festive decoration for seasonal festivities. Whether you’re looking to create some unique Christmas ornaments or just want to keep the kids entertained during the holiday season, this Popsicle Stick Santa Craft has you covered.
WHY YOU WILL LOVE THIS Popsicle Stick Santa Craft
This Popsicle Stick Santa Craft is perfect for a variety of reasons:
- Easy for Beginners: The steps are straightforward, making it accessible to those new to crafting.
- Uses Simple Materials: You can find most materials around the house, or purchase them at a low cost.
- Budget-Friendly: This is a low-cost holiday activity that doesn’t require expensive tools or materials.
- Quick to Make: You can complete this craft in under an hour, making it perfect for busy holiday schedules.
- Great for Home Decor: Once completed, your handmade Santas can brighten up your Christmas decorations.
- Great for Gifts: They can also be gifted, adding a personal touch to your holiday presents.
- Easy to Customize: You can personalize your Santas to fit your style or holiday decor.
PROJECT DETAILS
Skill Level
This project is categorized as beginner-friendly, making it suitable for children and adults alike.
Estimated Time
You can complete this easy craft in approximately 30 to 45 minutes, depending on your crafting speed.
Approximate Cost
Most of the materials are likely to be inexpensive, often totaling around $10 or less.
Best For
This craft is ideal for home decorating, creating gifts, or enjoying a fun holiday project with family and friends.
Project Type
This is a seasonal craft specifically designed for Christmas and holiday celebrations.
TOOLS AND EQUIPMENT NEEDED
Scissors
You will need scissors to cut out different shapes from the colored cardstock and DIY Santa pieces. Ensure you use safety scissors if children are involved.
Glue Stick
A glue stick is essential for securely attaching all elements of your Santa crafts together, providing a neat finish.
Black Marker Pen
The black marker is used to draw details such as eyes and embellishments, bringing your Santa to life.
MATERIALS
Popsicle Stick or Wooden Spoon
This serves as the base for your Santa figure, forming the body. Popsicle sticks are widely available and inexpensive.
Acrylic Paint
Use red for Santa’s hat and skin tone for his face. Non-toxic acrylic paint is safe for all ages and dries quickly.
Black Paper or Card Stock
This will be used to create Santa’s belt and will contrast nicely with the bright colors of the rest of the craft.
Red Paper or Card Stock
You’ll need red paper to craft Santa’s hat, which adds to the festive appearance.
Yellow Paper or Card Stock
Cut a small square from this paper to form Santa’s belt buckle, adding a dash of gold to your craft.
White Pom-Pom
This will serve as the fluffy trim for Santa’s hat, giving your craft a fun 3D texture.
Black Ribbon
The black ribbon is used to create the belt and add a decorative touch to your Popsicle Stick Santa.
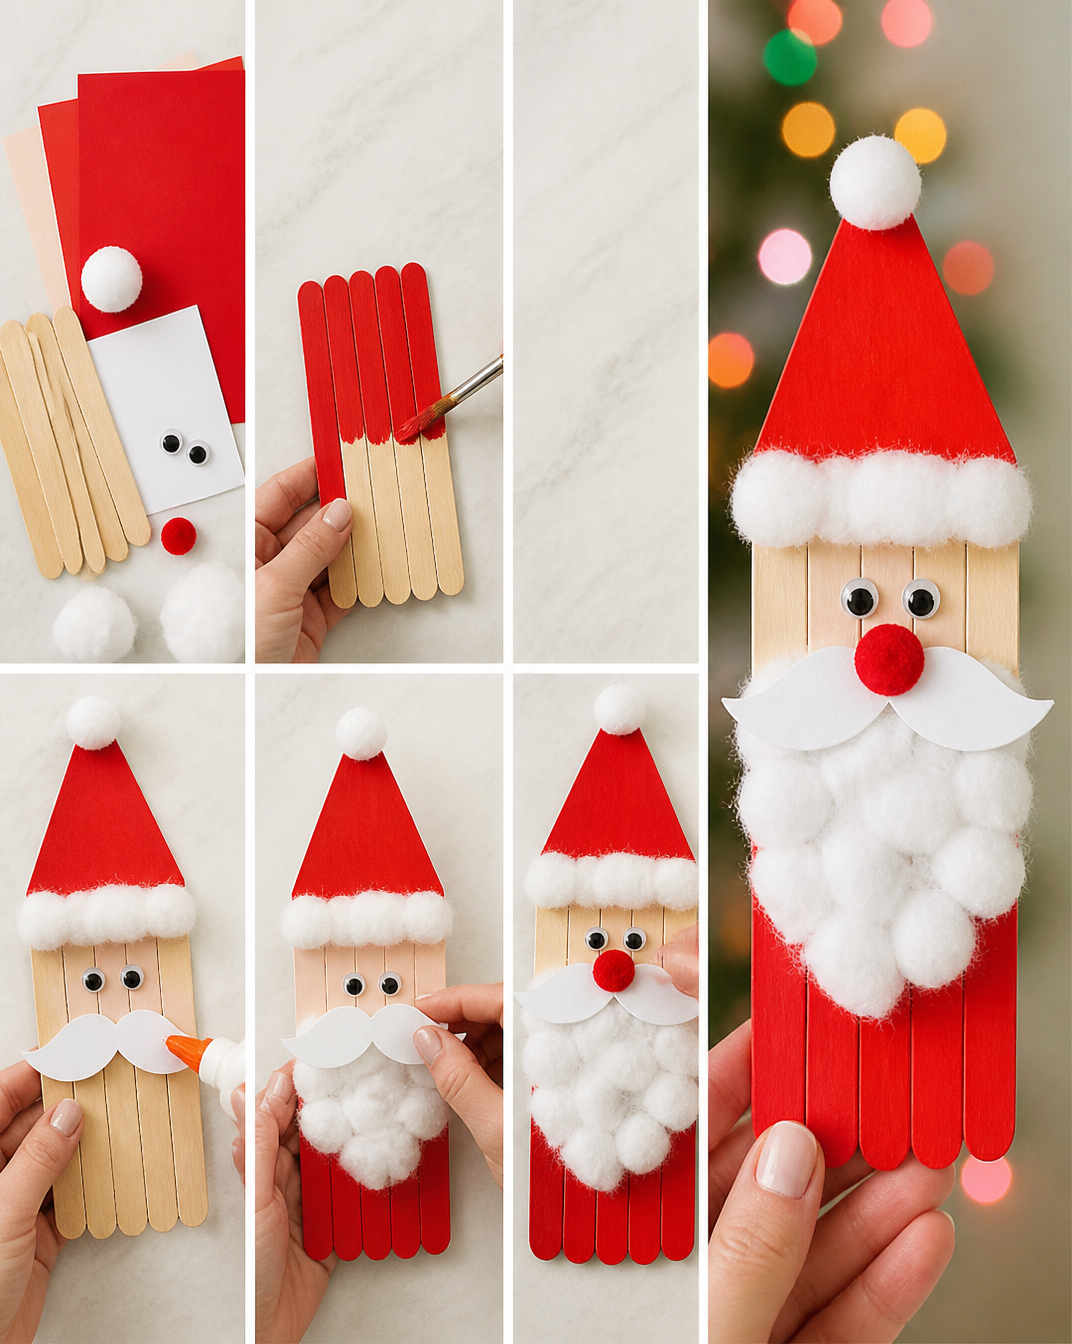
HOW TO MAKE Popsicle Stick Santa Craft
Step 1: Paint the Base
Start by painting the popsicle stick or wooden spoon red on one side. For the back, use a skin tone color to create Santa’s face. Make sure to let the paint dry completely before moving on to the next step.
Step 2: Prepare the Hat and Nose
Take the red cardstock and cut out a hat shape. Next, cut a small circle for Santa’s nose and trace it onto the red cardstock to keep the shape consistent.
Step 3: Assemble Santa’s Features
Glue the nose onto the beard, which you can make by cutting a beard shape out of the white cardstock or paper. Then, attach both the moustache and nose to the designated areas of the face, which should be the skin-toned side of your painted popsicle stick.
Step 4: Attach the Beard
Secure the beard you created earlier onto Santa’s face element. Make sure the edges are glued down well to give it a neat appearance.
Step 5: Secure the Hat
Take the red hat and glue it onto the top of the face, ensuring to leave a sufficient space for his eyes.
Step 6: Add Eyes
Using the black marker pen, draw Santa’s eyes on the skin-toned area of the face, just below the hat.
Step 7: Create the Belt
Cut a strip from the black paper or cardstock and glue it around the waist area of the popsicle stick. This will mimic Santa’s belt.
Step 8: Add the Belt Buckle
Finally, take the yellow paper and cut a small square to create the belt buckle. Glue this piece in the center of the black strip to complete the look.
TIPS AND TRICKS
- Choosing Materials: Stick with non-toxic and safe materials especially if children are involved in crafting.
- Cutting and Gluing: Use precise cuts to make the details stand out and ensure a strong bond when gluing.
- Avoiding Common Mistakes: Be careful not to overload the glue, as it can make it messy. A little goes a long way.
- Getting a Better Finish: Allow paint layers to dry fully before adding other materials to avoid smudging.
- Saving Money: Repurpose leftover materials from other crafts for decoration.
- Making the Craft Last Longer: Use a sealant spray over the paint to help it last even longer and make it more durable.
- Working Safely: Always supervise young children when using scissors and sharp tools.
VARIATIONS AND CUSTOMIZATION IDEAS
- Different Colors: Experiment with different shades for Santa’s outfit, such as green or blue, for a unique look.
- Different Sizes: Create smaller or larger versions of your Santa figure depending on the crafting mood.
- Seasonal Versions: Customize for different holidays by changing Santa to other figures, like a snowman or elf.
- Different Patterns: Add patterns such as polka dots or stripes to Santa’s outfit for added flair.
- Personalized Versions: Add names or initials to your Santas, making them more personal gifts for friends and family.
Popsicle Stick Santa Craft FAQ
Is this craft difficult for beginners?
No, this Popsicle Stick Santa Craft is very beginner-friendly, using simple materials and steps.
How long does it take to complete this craft?
It takes approximately 30 to 45 minutes to create your Santa figure, allowing for drying time as needed.
What materials do I need?
You will need popsicle sticks, acrylic paint, various cardstock colors, scissors, a glue stick, a black marker pen, a white pom-pom, and black ribbon for this craft.
Can I store these crafts for next year?
Yes! These crafts can be stored in a cool, dry place and should hold up well for future decorations.
How do I clean up after this DIY project?
Use warm soapy water to clean any paint spills. Ensure all materials are put away properly to keep your workspace tidy.
CONCLUSION
Creating your own Popsicle Stick Santa Craft is a simple craft that can bring joy and creativity into your holiday season. With its easy steps and minimal materials, this DIY home decor project is perfect for both seasoned crafters and beginners. Not only does it allow for creativity and personalization, but it also is a wonderful way to spend time crafting with family and friends. Encourage others to join in on the fun by sharing your experiences, finished pieces, or your own customizations. Happy crafting!