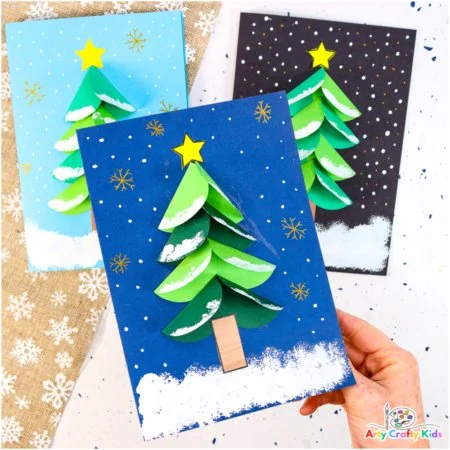
Making a Paper Circle Christmas Tree Card is a delightful and easy DIY project that the whole family can enjoy! This handcrafted card serves as a perfect holiday greeting or gift for loved ones. With simple materials and straightforward instructions, this project is great for beginners who want to create homemade decorations or gifts for the festive season. This budget-friendly craft can bring joy not just during Christmas, but can also inspire creativity all year round.
WHY YOU WILL LOVE THIS Paper Circle Christmas Tree Card
You will love making this Paper Circle Christmas Tree Card for several reasons:
- Easy for Beginners: This project is designed with simplicity in mind, making it perfect for those who are new to crafting.
- Uses Simple Materials: The materials required are common household items, which make it accessible and affordable.
- Budget-Friendly: You can create these cards without spending a lot, making it a cost-effective craft for holiday greetings.
- Quick to Make: With a bit of planning, you can easily complete this card in about 30-45 minutes.
- Great for Home Decor: This card can also be displayed as part of your festive home decor, adding a personal touch.
- Great for Gifts: Handcrafted gifts carry a special meaning, and this card can be a lovely addition to a present.
- Easy to Customize: You can personalize your card in many ways, making each one unique.
PROJECT DETAILS
Skill Level
Beginner-friendly. This project requires minimal skills, making it perfect for crafters of all ages.
Estimated Time
Approximately 30-45 minutes. You can complete this craft in under an hour, allowing you to create multiple cards.
Approximate Cost
Low-cost. Most materials are inexpensive or already available at home, making this a budget-friendly DIY project.
Best For
This project is suitable for holiday greetings, gifts, and seasonal decorating.
Project Type
Homemade Christmas card. Ideal for personal use or gifts to friends and family, it embodies the spirit of Christmas crafting.
TOOLS AND EQUIPMENT NEEDED
Scissors
Used for cutting the paper circles and trimming any excess material.
Ruler
Helpful for measuring and ensuring straight lines when cutting or folding.
Glue
Essential for attaching the different elements of the card together securely.
Pencil
Used for marking measurements before cutting and folding, ensuring accuracy.
Paintbrush
Optional, but useful for applying paint or adding artistic touches to the card.
MATERIALS
Green Paper
You will need green paper to create the tree circles. This is the main visual element and can be in various shades for a more dynamic look.
Card Stock
This will serve as the base of your Christmas card. Choose a sturdy card stock in a light color to make the tree pop.
White Paint
Used to create the snowy base and effects, adding a winter feel to your card.
Gold Acrylic Pen
This is optional but great for drawing decorative elements such as snowflakes around the tree.
Paint Sponge or Pom-Pom
Used for dabbing white paint to create the snowy effect on the card.
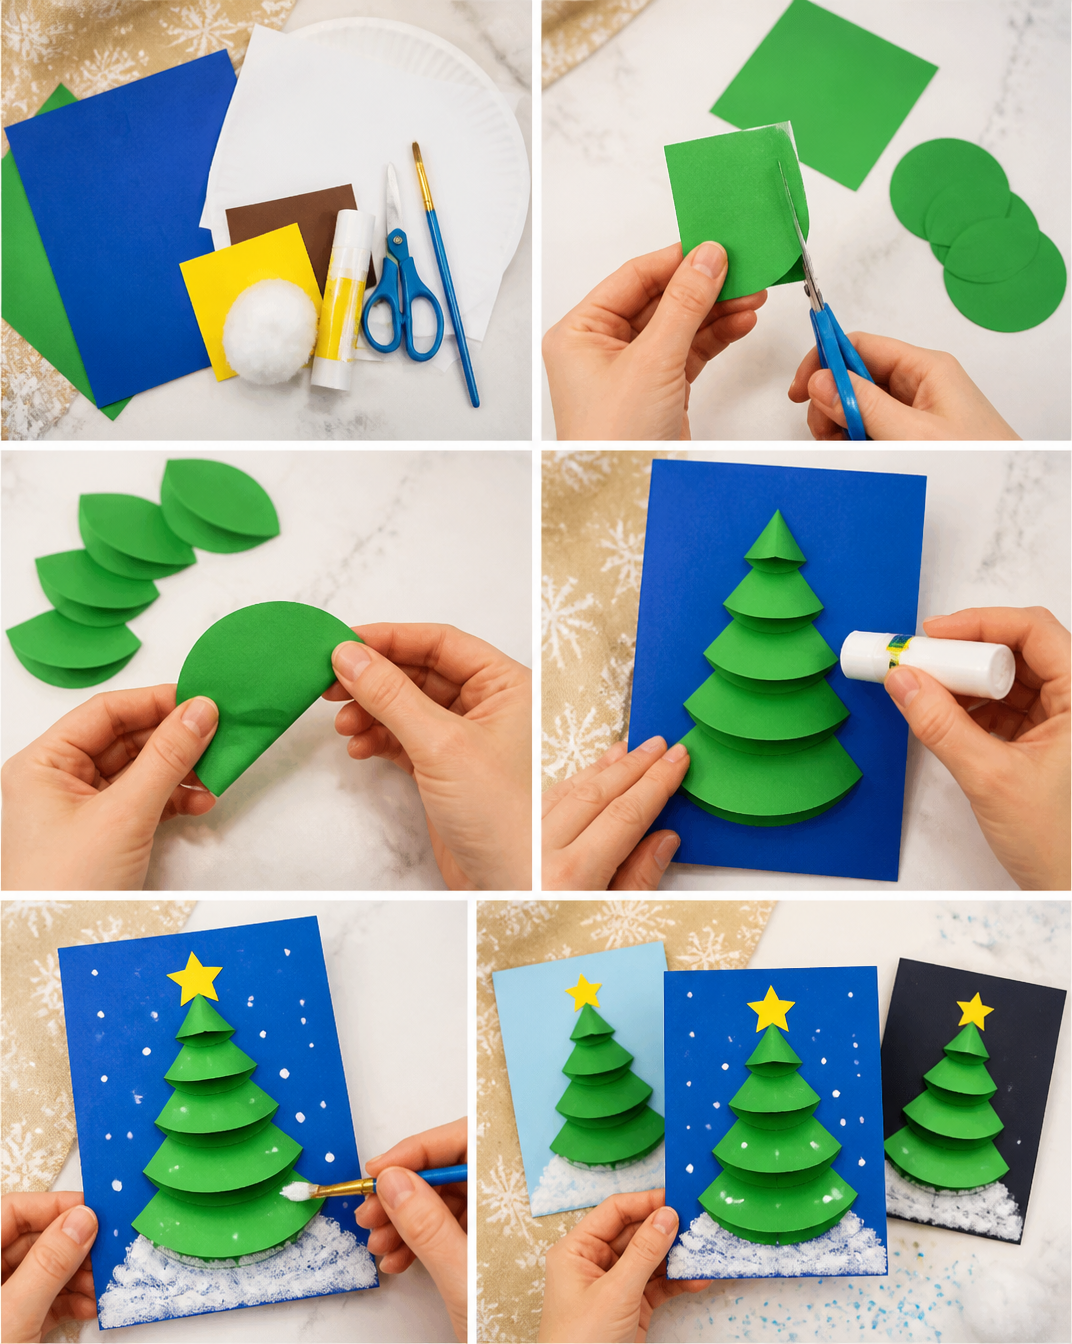
HOW TO MAKE Paper Circle Christmas Tree Card
Step 1: Prepare the Paper Circles
Begin by cutting out 8 green circles from your green paper. The circles should be of varying sizes to create depth in your Christmas tree.
Step 2: Fold the Circles in Half
Fold each circle in half carefully. This will allow you to layer them effectively and gives your tree a three-dimensional look.
Step 3: Fold a Sheet of Card Stock
Take your card stock and fold it in half to create the base of your Christmas card. Run your finger, a ruler, or a popsicle stick along the edge to ensure a neat fold.
Step 4: Glue the Christmas Tree Trunk
Cut a rectangle from the brown paper for the tree trunk. Glue it to the front of your folded card, centered and about 2-3 cm above the bottom edge of the card.
Step 5: Assemble the Christmas Tree Layers
Start with the widest layer of your tree. Apply glue to one side of two halves, placing the first half just above the trunk. Attach the second half inside the first half to form an ‘L’ shape. Continue this process, layering and placing each subsequent pair of halves behind the previous ones, working your way up until the tree is complete.
Step 6: Draw Snowflakes
Using a gold acrylic pen or similar, draw snowflakes around your Christmas tree. This adds an extra touch of festive cheer to your card.
Step 7: Create a Snowy Base
Take your white paint and use a sponge or pom-pom to dab along the bottom of the card, creating a snowy effect to complement your tree.
Step 8: Add Extra Snowfall
Using a paintbrush, add small dots of white around the tree to represent falling snow. This enhances the wintery feel of your card.
Step 9: Write a Special Message
Open the card and write a heartfelt message inside for your recipient. This personal touch makes your card even more special.
TIPS AND TRICKS
- Choosing Materials: Use high-quality paper for your circles to ensure they hold their shape, and opt for card stock that is sturdy enough to stand on its own.
- Cutting and Folding: When cutting out circles, it may help to trace around a cup or round object for perfect shapes.
- Gluing: Allow glue to dry properly after each layer to prevent slipping as you build your tree.
- Cleaning: Keep a damp cloth nearby to quickly wipe up any glue spills or paint marks while working.
- Making it Last Longer: To protect your card, consider spraying it with a clear acrylic sealer once it’s dry.
VARIATIONS AND CUSTOMIZATION IDEAS
- Different Colors: Experiment with various shades of green or even other colors like blue or white for a winter theme.
- Different Sizes: Try making larger tree cards or smaller versions; you could even make a set of mini cards.
- Different Patterns: Use patterned paper instead of solid colors for the circles for a fun and unique design.
- Seasonal Versions: Adapt the card for other holidays, using different shapes or colors that reflect those seasons.
- Handwritten Messages: Personalize messages with handwritten notes or printed quotes inside the card.
- Add Glitter: For extra sparkle, consider adding glitter to the snowflakes or tree decorations.
Paper Circle Christmas Tree Card FAQ
How difficult is this craft?
This craft is beginner-friendly and easy to follow. Even if you have little or no crafting experience, this project is straightforward.
What materials do I need?
You will need green paper, card stock, white paint, a gold acrylic pen, glue, scissors, and a ruler. Most of these should be readily available at home.
How long does it take to make this card?
The entire project usually takes about 30 to 45 minutes, depending on your crafting speed.
How can I store the finished cards?
Store the completed cards in a cool, dry place. You can keep them flat in a box to avoid any bending or damage.
Can I customize the card?
Absolutely! You can use different colors, patterns, and sizes, or even create themed versions for other holidays.
CONCLUSION
Creating a Paper Circle Christmas Tree Card is an enjoyable and engaging DIY project. It is easy, budget-friendly, and offers plenty of opportunities for creativity. This handmade card not only makes for a thoughtful gift but can also brighten up your holiday decorations.
Ready to give this simple craft a try? Gather your supplies, follow the easy steps, and don’t forget to share your finished project or customization ideas with others. Happy crafting!