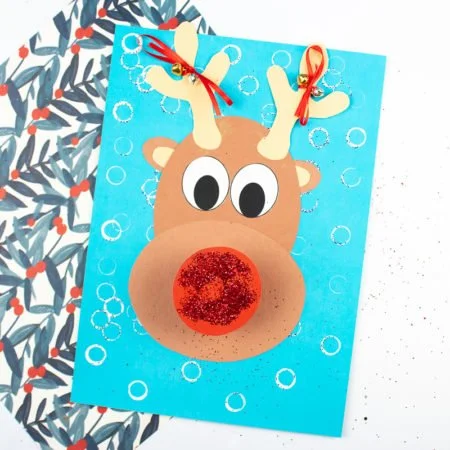
Make festive memories with the Jingle Bells Rudolph Reindeer Craft! This easy DIY project is perfect for holiday decorating, creating homemade gifts, and engaging in creative fun with family. With simple materials and beginner-friendly instructions, this craft brings joy and cheer to your home décor while offering a fun, budget-friendly way to celebrate the season.
WHY YOU WILL LOVE THIS JINGLE BELLS RUDOLPH REINDEER CRAFT
This delightful Jingle Bells Rudolph Reindeer Craft is enjoyable for various reasons:
- Easy for Beginners: This craft is simple and straightforward, making it accessible for those new to DIY projects.
- Uses Simple Materials: The craft requires common materials that you can find at home or easily purchase.
- Budget-Friendly: With minimal expenditure, you can create charming decorations or gifts for family and friends.
- Quick to Make: The project can be completed in under an hour, making it perfect for a rainy day or last-minute holiday preparations.
- Great for Home Décor: Finished Rudolphs can brighten up your living space as charming seasonal décor.
- Fantastic for Gifts: Create personalized handmade gifts, perfect for loved ones during the holiday season.
- Easy to Customize: There are numerous ways to make Rudolph unique to your style or to match your holiday theme.
PROJECT DETAILS
Skill Level
This craft is beginner-friendly, making it ideal for novice crafters.
Estimated Time
Expect to spend about 30 to 45 minutes on this project, allowing for some drying time if glue is used.
Approximate Cost
The total cost is minimal, usually around $5 to $10, depending on the materials you already have at home.
Best For
This craft is suitable for kids, adults, and families wanting to spend quality time together while making festive creations.
Project Type
This is a simple craft that doubles as decorative art for the holiday season.
TOOLS AND EQUIPMENT NEEDED
Scissors or Paper Cutter
Used to cut out shapes and create the components of your Rudolph.
Glue Stick
Essential for assembling the craft. A glue stick minimizes mess and makes it easier for kids to use.
Pencil
A simple tool for tracing shapes onto paper, making it easier to get the correct sizes.
Circular Item for Printing (optional)
Use an item like bubble wrap or a LEGO piece to create circular prints for decorative elements.
MATERIALS
Brown Paper
This will be used to create the main body of Rudolph. You will need two large ovals for his head and face.
Beige Paper
Used for the antlers and the inner ear oval to add contrast to your Rudolph.
Red Cardstock
A striking choice for Rudolph’s nose. It will also grab attention.
Blue Cardstock
This will serve as a beautiful backdrop for your Rudolph to stand out against.
Red Ribbon
Used to tie on the jingle bells—adding a festive touch to your reindeer.
Jingle Bells
These little bells bring a fun, musical element to the project, perfect for the holiday spirit.
Glue Stick
An important part of the assembly process, ensuring all parts stay together.
White Paint (optional)
You can create a snowy background or add details to your reindeer if you feel creative.
Circular Item for Printing (e.g., bubble wrap, LEGO) (optional)
This option can be used for adding decorative prints resembling snowflakes.
HOW TO MAKE JINGLE BELLS RUDOLPH REINDEER CRAFT
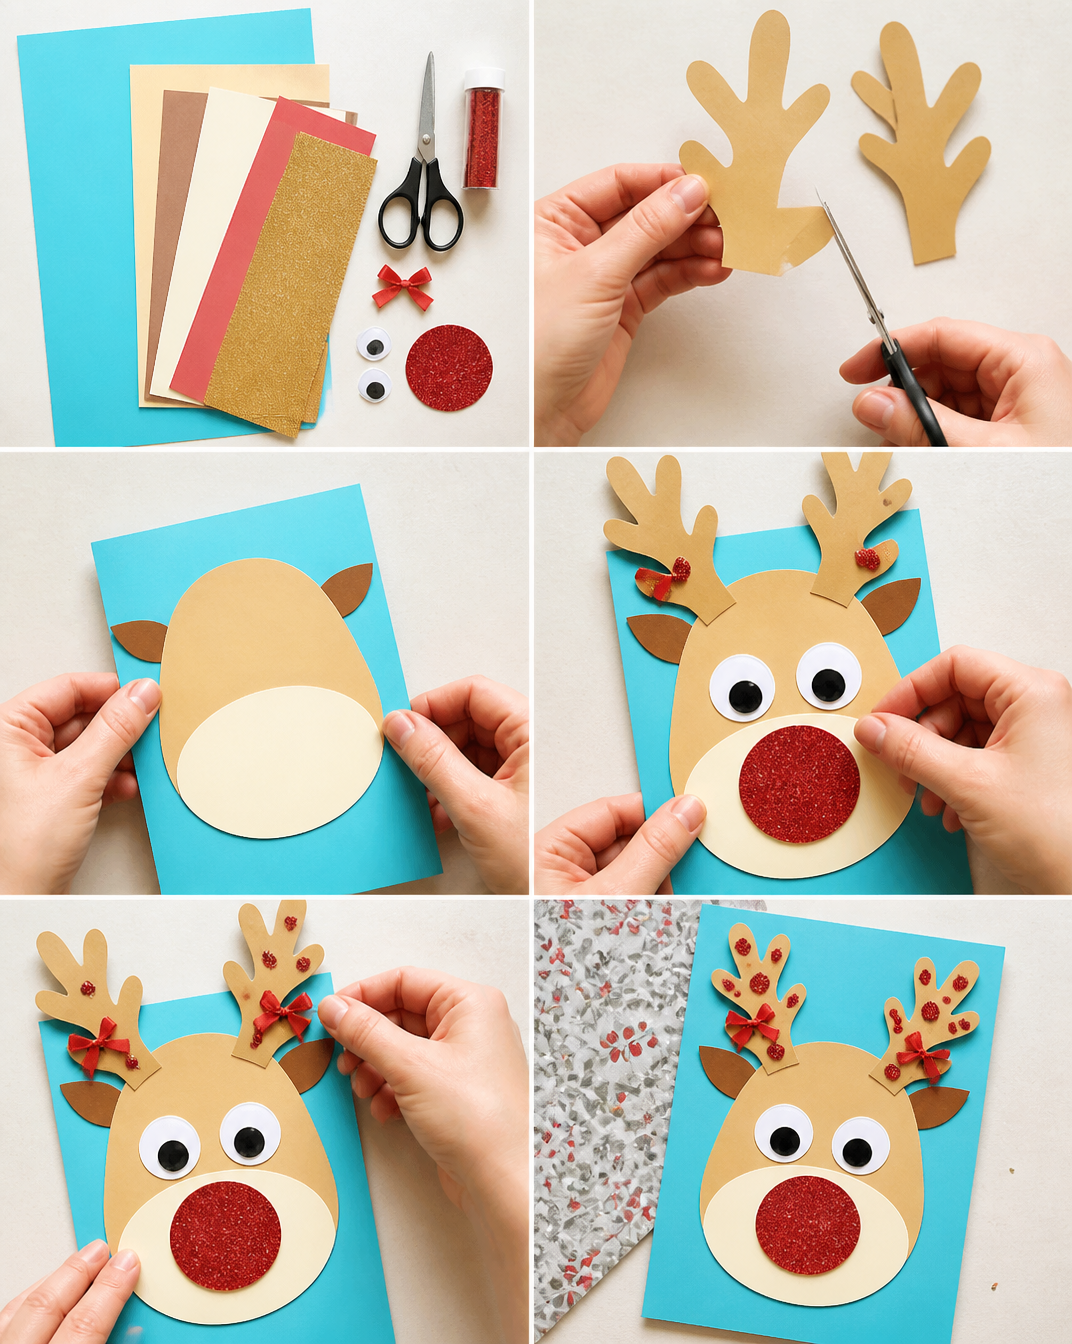
Step 1: Download and Print the Rudolph Template
Begin by downloading the Rudolph template. Print it out and color it in as desired. This template will guide your crafting process.
Step 2: Trace Shapes onto Colored Paper
Use the printed template to trace the following shapes:
- Brown Paper: Trace two large ovals for Rudolph’s head and body, and one outer ear.
- Beige Paper: Trace the antlers and an inner ear oval.
- Red Cardstock: Trace one large circle for the nose.
Step 3: Arrange the Shapes
Position the shapes as they appear in the template. Make sure to place the larger brown oval at the bottom and the smaller one above it horizontally to create the face and head of Rudolph.
Step 4: Assemble the Ears
Layer the beige ear and antler shapes over the brown ovals. Attach the antlers strategically between the ears using glue.
Step 5: Position the Second Brown Oval
After placing the ears in position, add the second brown oval and glue it in place.
Step 6: Add the Eyes
Position two googly eyes or cut-out circles above the horizontal oval. Secure them using glue.
Step 7: Create the Red Nose
Cut two strips of red paper from the short side of an A4 sheet. Position these strips at a 90-degree angle and glue them together, forming an accordion fold. Keep folding until you run out of paper and seal the ends.
Step 8: Attach the Red Nose
Glue one end of the accordion fold to the center of the horizontal oval. Secure the big red circle (the nose) at the other end.
Step 9: Finish Up with Jingle Bells
Thread two jingle bells onto a piece of red ribbon and securely tie them onto the antlers to bring your Rudolph to life.
Step 10: Optional Snowy Background
For an extra touch, dip a circular item into white paint and print it onto your backdrop for a snowy effect.
TIPS AND TRICKS
- Choosing Materials: Use sturdy paper for better durability. Recycled paper can work well too—making this a great upcycled craft!
- Cutting Techniques: For smooth edges, use sharp scissors or a paper cutter to achieve clean lines.
- Gluing: Apply glue evenly to avoid loose attachments. A glue stick is less messy and easier for kids.
- Finer Details: Consider using a fine-tipped marker for outlining details on your Rudolph to make it pop.
- Saving Costs: Look around your home for materials you can repurpose before purchasing new items.
- Storage: If made with regular paper, ensure the Rudolph is kept in a dry place to prevent deterioration.
- Safety: Ensure children are supervised, especially when using scissors. Opt for safety scissors for young crafters.
VARIATIONS AND CUSTOMIZATION IDEAS
- Different Colors: Experiment with stickers or paints to change the color palette of Rudolph.
- Different Sizes: Create mini versions of Rudolph to hang on the tree or larger ones to place on your mantelpiece.
- Seasonal Versions: Make variations for spring or summer using different themes and colors—perhaps a bunny or other cheerful animals!
- Different Materials: Use fabric scraps instead of paper for a tactile version of Rudolph.
- Personalized Versions: Add names or messages to the Rudolph as a customized gift for someone special.
- Creative Patterns: Use decorative patterned paper to give your Rudolph a unique look.
JINGLE BELLS RUDOLPH REINDEER CRAFT FAQ
What materials do I need for this craft?
You will need brown, beige, and red cardstock, scissors, glue, and jingle bells, among other supplies.
Are there any safety measures to consider?
Yes, supervise children when using scissors. If using glue, ensure it is safe for younger kids.
How long does it usually take to make this craft?
This project typically takes around 30–45 minutes to complete.
Can I customize my Rudolph?
Absolutely! You can use different colors or materials to create your own unique version.
Is this craft suitable for all age groups?
Yes! This is a beginner-friendly craft that can be enjoyed by kids, adults, and families alike.
CONCLUSION
The Jingle Bells Rudolph Reindeer Craft is an easy and enjoyable project suitable for all ages. It leverages simple materials, provides quick satisfaction, and encourages creativity. Not only is this a budget-friendly DIY project, but it also serves as a charming decoration or a personalized gift during the festive season. Encourage your crafty spirit, give it a try, and don’t forget to share your experiences and customizations!