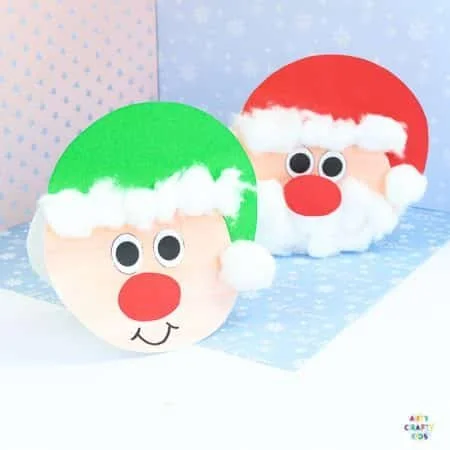
Creating a festive Easy Santa Christmas Card is a delightful DIY project that anyone can tackle. This simple craft offers an enjoyable way to unleash your creativity while spreading holiday cheer. With minimal materials required and straightforward instructions, this project is perfect for beginners and seasoned crafters alike. Plus, it’s a budget-friendly craft that makes for a charming homemade gift or decoration for the holiday season.
WHY YOU WILL LOVE THIS Easy Santa Christmas Card
There are numerous reasons why making this Easy Santa Christmas Card will be a satisfying experience:
- Easy for Beginners: This project does not require advanced crafting skills, making it ideal for those new to DIY activities.
- Uses Simple Materials: Most of the materials needed are commonly found or easily accessed, ensuring anyone can get started without special trips.
- Budget-Friendly: Designed with a modest budget in mind, you’ll be able to create lovely cards without breaking the bank.
- Quick to Make: With an estimated time of around 30 minutes, you can create many cards in one sitting.
- Great for Home Decor: These cards can double as festive décor items, adding a personal touch to your holiday decoration.
- Perfect for Gifts: Handmade cards are thoughtful gifts; they show your love and effort in a unique way.
- Easy to Customize: You can personalize your cards with different colors and designs to match your style.
PROJECT DETAILS
Skill Level
Beginner-friendly: This Easy Santa Christmas Card project is perfect for beginners, as it requires no advanced skills, just basic cutting and gluing.
Estimated Time
Approximately 30 minutes: This allows for a relaxed crafting session, even if you’re creating multiple cards.
Approximate Cost
Low cost: Most of the materials are inexpensive or can be found around the house, making it a budget-friendly DIY project.
Best For
Great for seasonal events: This project is best suited for holiday crafts and can be enjoyed with family or friends during the Christmas season.
Project Type
Hands-on craft: This DIY project involves hands-on activities including cutting, coloring, and gluing, ideal for nurturing creativity.
TOOLS AND EQUIPMENT NEEDED
Scissors
An essential tool for cutting paper and creating the various card elements you’ll need.
Glue Stick
This will help you attach different components of your card securely without making a mess.
Black Marker Pen
Used for adding details to your Santa card, like facial features, making it more fun and personalized.
MATERIALS
White Cardstock
This serves as the base of your card due to its sturdiness and smooth finish, making it easy to write on.
Coloured Construction Paper
You’ll use different colors to craft your Santa’s hat and facial features, adding vibrancy to the card.
Coloured Pencils or Crayons
These will help you add additional color and designs to your card’s elements, making it even more festive.
Cotton Wool
Perfect for creating a fluffy Santa hat and beard, adding texture and a 3D effect to your card.
Glue Stick
This will hold all your pieces together securely, ensuring each component stays in place.
Black Marker Pen
Useful for details such as the eyes and mouth of Santa, enhancing the card’s character.
HOW TO MAKE Easy Santa Christmas Card
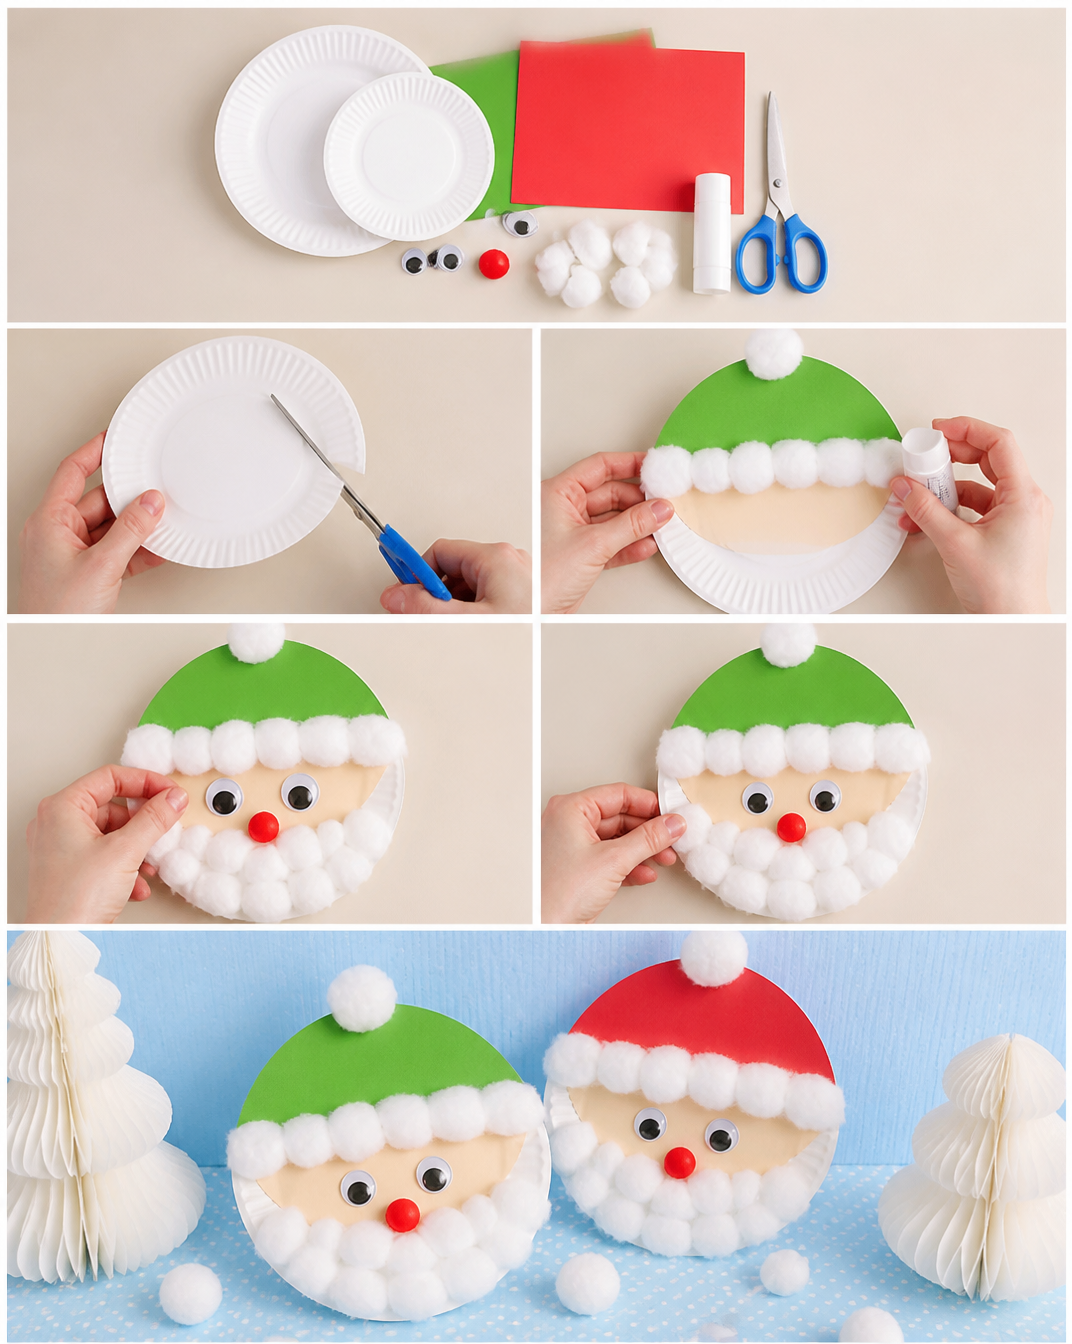
Step 1: Prepare the Template
Begin by choosing the colors for Santa’s hat and nose. You can either color these directly on the white cardstock or cut out shapes from the colored construction paper.
Step 2: Trace the Circular Face
Use a round object to trace a circular shape on the white cardstock. This will form the face of the Santa.
Step 3: Cut Out the Elements
Once the face is traced, cut it out carefully. If you’re using construction paper for the nose and hat, cut those elements out as well.
Step 4: Fold the Cardstock
Fold the cardstock in half. Make sure the edges are aligned to create a neat card.
Step 5: Cut out the Circular Card
Using the fold as a guide, cut along the outline you traced to create the circular card base.
Step 6: Add the Elements
Attach the hat and add the eyes (from the colored construction paper or drawn with the black marker) to your Santa card.
Step 7: Add Cotton Wool
Carefully glue cotton wool onto the edge of Santa’s hat and at the tip. Use some wool to create a beard, giving Santa a fluffy look.
Step 8: Complete the Santa Card
Finish the card by gluing on the big red nose, adding a cheerful touch to your Santa face.
Step 9: For the Elf Card
To switch things up, you can make an elf card by changing the hat color to green and replacing the beard with a big smile.
TIPS AND TRICKS
- Choosing Materials: Use high-quality materials for a more polished final product. Cardstock is sturdier than regular paper and holds up better.
- Cutting Techniques: Take your time when cutting out shapes. Precise cuts will improve the overall look of your card.
- Gluing: Use an even layer of glue with your glue stick to prevent any wrinkling in the paper.
- Mistakes: If you make a mistake coloring or cutting, don’t panic! You can always cut a new piece or cover it up creatively.
- Finishing Touches: Consider adding glitter or stickers for an extra festive flair.
- Storage: Keep your finished cards in a flat box to avoid bending or damaging them.
VARIATIONS AND CUSTOMIZATION IDEAS
- Different Colors: Use varying colors for the hat, eyes, and other parts to create a different look.
- Different Sizes: Vary the size of your cards to create a mix of card types—small thank-you cards or larger greeting cards.
- Personalized Versions: Add family names or personal messages inside to create custom cards for your friends.
- Holiday Versions: Design similar cards for other holidays by changing colors and themes; for example, switch Santa for a bunny in spring.
- Different Patterns: Incorporate various patterns in the hats, like stripes or polka dots, to give a unique flair to each card.
Easy Santa Christmas Card FAQ
What materials do I need?
You’ll need white cardstock, colored construction paper, colored pencils or crayons, cotton wool, a black marker pen, a glue stick, and scissors to create your Easy Santa Christmas Card.
Is this craft suitable for kids?
Yes! This project is perfect for kids and beginners. It’s easy to follow and uses simple materials.
How can I store my finished cards?
Keep your finished cards flat in a box or envelope to prevent bending. This will help them last longer until you are ready to send them or display them.
How long does it take to make one card?
You can expect to spend about 30 minutes on each card, but once you’ve mastered it, you could create multiple cards in just an hour.
Can I personalize this card for different occasions?
Absolutely! You can easily customize this Easy Santa Christmas Card with different colors, patterns, or even themes for various holidays.
CONCLUSION
The Easy Santa Christmas Card is a wonderful way to get into the festive spirit while creating something meaningful. Its simplicity makes it an excellent choice for beginners, while its potential for customization ensures that your cards will be unique. This budget-friendly craft is not only perfect for holiday decorating or gift-giving but also a fantastic opportunity to share creativity with friends and family. We encourage you to try making these cheerful cards and share your finished creations or customization ideas. Happy crafting!