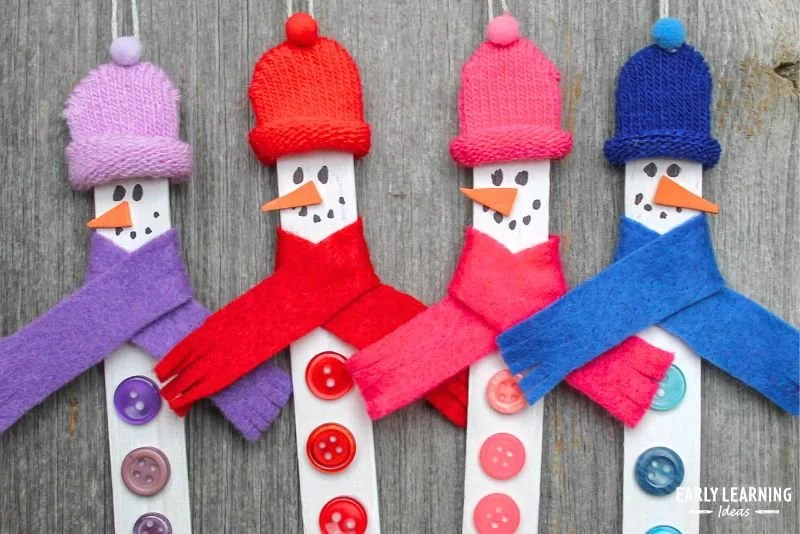
Snowman Crafts For Kids: A DIY Snowman Christmas Ornament is the perfect easy craft to help kids get into the holiday spirit. This fun DIY project combines creativity with simple materials, allowing little ones to create their own festive decorations. Plus, these adorable snowman ornaments make delightful homemade gifts for family and friends or charming DIY home decor for seasonal decorating. If you’re looking for budget-friendly crafts that are beginner-friendly and provide an avenue for imaginative expression, this snowman craft is an excellent choice!
WHY YOU WILL LOVE THIS Snowman Crafts For Kids
Making snowman ornaments is a fantastic way for kids to express themselves artistically while enjoying the holiday season. This easy DIY project offers several appealing benefits:
- Easy for Beginners: Each step is clear and simple, making it great for kids and those new to crafting.
- Uses Simple Materials: Most items can be found around your home or easily purchased from a craft store.
- Budget-Friendly: This DIY craft costs little to make, using inexpensive materials.
- Quick to Make: You can complete this craft in under an hour, making it perfect for quick holiday projects.
- Great for Home Decor: Hang these ornaments on your Christmas tree or use them to brighten up your home.
- Homemade Gift Potential: These handmade gifts are sure to be cherished by loved ones.
- Easy to Customize: Children can alter colors and details to make each ornament unique.
PROJECT DETAILS
Skill Level
Beginner
This craft is easy enough for beginners, making it suitable for kids and novice crafters.
Estimated Time
30-60 minutes
With time allowed for drying paint and glue, you can complete making these snowman ornaments quickly.
Approximate Cost
$10 or less
Most of the materials are affordable, making it a budget-friendly DIY project.
Best For
Kids and families
This craft is fantastic for children, whether working independently or with adults for guidance.
Project Type
Easy crafts for kids
This snowman ornament project falls under DIY crafts, holiday crafts, and handmade gifts.
TOOLS AND EQUIPMENT NEEDED
Sharpie
The Sharpie is used for drawing the eyes and mouth on the snowman, providing clean lines and vibrant color.
Needle
Creating a hanging loop for your snowman requires using a needle to thread yarn or embroidery floss through the hat.
Scissors
Scissors are essential for cutting gloves, felt, and yarn to the desired length for hats and scarves.
MATERIALS
Large Craft Sticks
These are the main structure for your snowman. They provide a sturdy base to build upon.
Inexpensive Gloves (in Several Colors)
Cut the fingers off the gloves to create colorful hats for your snowman ornament.
Felt (in Several Colors)
Felt is used to craft scarves for your snowman. Choose different colors to create vibrant designs.
Tiny Pom Poms
Pom poms add fun details to your snowman, serving as buttons or decorations on the body.
White Paint
Painting the craft sticks white gives your snowman a classic appearance.
Glue Dots
These are used to attach the hat securely to the craft sticks and are easy to work with for kids.
White Glue
White glue helps in bonding various parts like the collar of the scarves or adding pom poms to the snowman’s body.
Orange Self-Adhesive Foam
This foam is used to create the carrot nose for your snowman, offering a bright and realistic touch.
Embroidery Floss or Yarn
This is used to create the hat loop for hanging and adds detail to the snowman.
A Paperclip (optional)
A paperclip can be useful for holding the scarf in place while the glue dries.
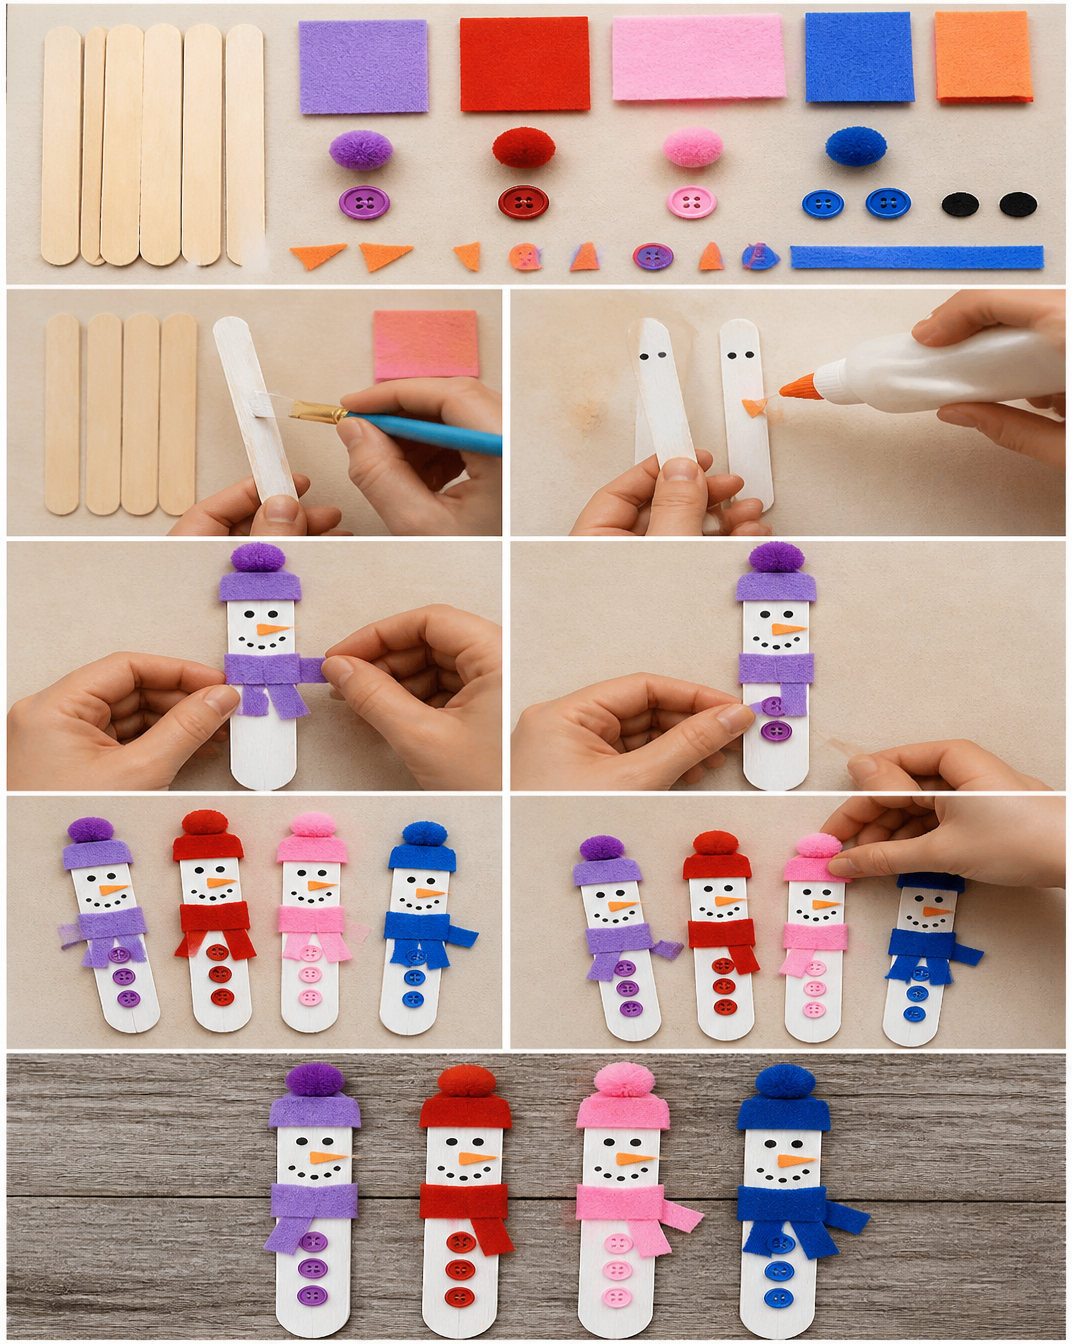
HOW TO MAKE Snowman Crafts For Kids
Follow these simple steps to create your delightful DIY snowman ornament.
Step 1: Paint the Craft Sticks
Begin by painting your large craft sticks white. This gives the snowman its snowy base. Allow the paint to dry completely before moving on to the next step.
Step 2: Prepare the Gloves
Take your inexpensive stretchy knit gloves and cut the fingers off. For each finger, roll up the edge to hide the raw edges, making a neat finish. This will serve as the hat for your snowman.
Step 3: Create the Hat Loop
Using a needle, thread your choice of embroidery floss or yarn through the top of your glove’s finger. This loop allows you to hang your snowman ornament.
Step 4: Attach the Hat
Position the cut glove finger on top of the painted craft stick. Use two glue dots to securely attach the glove to the stick.
Step 5: Make the Scarf
Cut strips from your colored felt measuring about 5 and 1/2 inches long and about 1/2 inch wide. These strips will be the scarves for your snowman.
Step 6: Secure the Scarf
Wrap the felt scarf around the neck area of the snowman. Apply white glue to hold it in place and use a paperclip to keep it secure while it dries.
Step 7: Draw the Face
Take a Sharpie and draw the mouth and eyes on the snowman’s face to give it a personality. Be creative and let your child’s imagination shine!
Step 8: Add the Carrot Nose
Cut a small triangle from the orange self-adhesive foam to create the snowman’s carrot nose. Stick it in place on the face.
Step 9: Final Touches
To add some extra charm, glue a few tiny pom poms onto the front of the craft stick to resemble buttons or snowflakes.
Step 10: Allow to Dry
Before displaying your snowman ornament, make sure all glue and paint are completely dry.
TIPS AND TRICKS
- Choosing Materials: When selecting gloves, pick bright colors to create a cheerful look. Avoid fuzzy or thick styles for a neater appearance.
- Cutting and Gluing: Take your time cutting and gluing for precise results. For younger children, adult supervision may be necessary when using scissors and glue.
- Avoiding Common Mistakes: Ensure that the craft sticks are thoroughly dry before adding the hat to prevent it from slipping or falling off.
- Making the Project Easier: Pre-cut the materials ahead of time for younger children to simplify the crafting process.
- Getting a Better Finish: To achieve a smooth appearance for the paint, be sure to apply it in thin layers and let it dry properly between coats.
- Saving Money: Check your recycling bin or craft stash for old materials that can be repurposed rather than buying new items.
- Making the Craft Last Longer: Apply a clear spray sealer over the finished craft once dry to protect it and make it more durable.
- Working Safely: Always supervise kids around scissors and make sure they understand how to use them correctly.
VARIATIONS AND CUSTOMIZATION IDEAS
- Different Colors: Use various colored craft sticks and gloves to create a snowman family with different personalities.
- Different Sizes: Vary the size of your craft sticks for larger or smaller snowmen.
- Seasonal Versions: Customize the ornaments to reflect other seasons by changing the colors and materials used.
- Holiday Versions: Create themed snowmen for other winter holidays by adding accessories like scarves or hats that reflect special holidays.
- Different Patterns: Use patterned felt instead of solid colors for the scarves to add an extra layer of uniqueness.
- Personalized Versions: Let the kids write their names on the back of the craft stick for a personal touch.
Snowman Crafts For Kids FAQ
Is this craft suitable for young children?
Yes, this is a beginner-friendly craft suitable for kids with adult supervision, especially during cutting and gluing steps.
What materials do I need for this snowman craft?
You’ll need large craft sticks, stretchy gloves, felt, tiny pom poms, white paint, glue dots, white glue, orange self-adhesive foam, a Sharpie, embroidery floss or yarn, and a needle.
How long does it take to make this craft?
The completed project will take approximately 30-60 minutes, including drying time for paint and glue.
Can I store these ornaments?
Yes, once completely dry, these ornaments can be stored in a cool, dry place. They are durable and can be reused year after year.
How can I clean my snowman ornaments?
Avoid submerging them in water. Instead, dust gently with a soft cloth or a damp cloth for any spots.
CONCLUSION
Making Snowman Crafts For Kids is a delightful and engaging DIY project that offers a variety of creative opportunities. It’s an easy and budget-friendly craft that utilizes simple materials, making it perfect for beginners. Whether you use these ornaments for holiday decorations or as homemade gifts, they bring warmth and cheer to any setting. We encourage you to gather your materials and embark on this fun crafting journey. Share your experience or any customization ideas you have to make these snowmen unique!