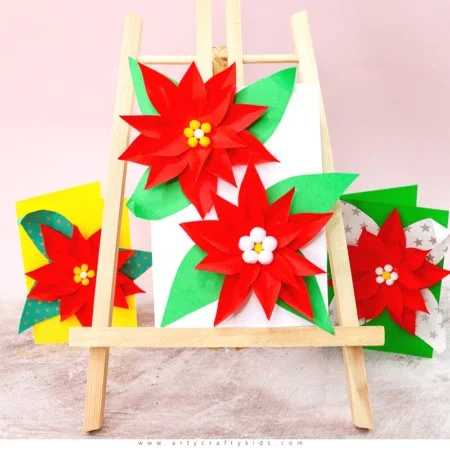
Creating an Easy Poinsettia Christmas Card is a joyful DIY project that embodies the spirit of the holiday season. This craft is perfect for those looking for easy crafts to brighten up their holiday greetings with a personal touch. Not only does this project utilize simple materials, but it’s also budget-friendly and a great opportunity to express creativity. Whether you are an experienced crafter or a beginner, this easy DIY craft will provide a delightful way to spread holiday cheer.
WHY YOU WILL LOVE THIS Easy Poinsettia Christmas Card
There are many reasons to dive into making this Easy Poinsettia Christmas Card. Let’s explore what makes this holiday craft so wonderful:
- Easy for beginners: The steps are straightforward and don’t require advanced crafting skills.
- Uses simple materials: Most of the materials you need are likely already in your home or can be easily acquired.
- Budget-friendly: It’s an economical option for sending heartfelt greetings during the holidays.
- Quick to make: This project can be completed in under an hour, making it easy to create multiple cards.
- Perfect for holiday decorating: Not only can you send these cards but they also make charming decorations.
- Easy to customize: You can easily personalize the cards to fit your style or the recipient’s preferences.
PROJECT DETAILS
Skill Level
This project is rated as beginner-friendly, making it ideal for those new to crafting.
Estimated Time
You can expect to spend around 30-45 minutes on this craft, allowing you to create multiple cards quickly.
Approximate Cost
This DIY project can be done for about $10 or less, especially if you have some materials on hand.
Best For
This project is perfect for anyone looking to create unique holiday cards, whether for friends, family, or yourself.
Project Type
This is a simple craft that falls under the category of seasonal crafts, specifically focused on Christmas.
TOOLS AND EQUIPMENT NEEDED
Scissors
Scissors are necessary for cutting out the flower shapes and any additional decorations you want to add to the card.
Glue (or glue stick)
A strong adhesive or glue stick is essential to attach the poinsettias and any embellishments to your card.
Ruler
A ruler can help you measure your cardstock and ensure you cut straight lines for your cards.
MATERIALS
Cardstock
Cardstock serves as the base for your Christmas cards. It is sturdier than regular paper, making it perfect for crafting.
Red and Green Paper
These colors represent the classic poinsettia. Use red paper to create the flowers and green paper for the leaves.
Gold/Glimmer Paper (optional)
If you want to add a touch of sparkle to your cards, gold or glitter paper can be used for accents or the flower centers.
Markers or Pens
Markers or pens are helpful for writing personal messages inside the cards and adding decorative touches.
Pencil
A pencil is used for sketching out flower shapes before cutting them out, ensuring a neat finish.
HOW TO MAKE Easy Poinsettia Christmas Card
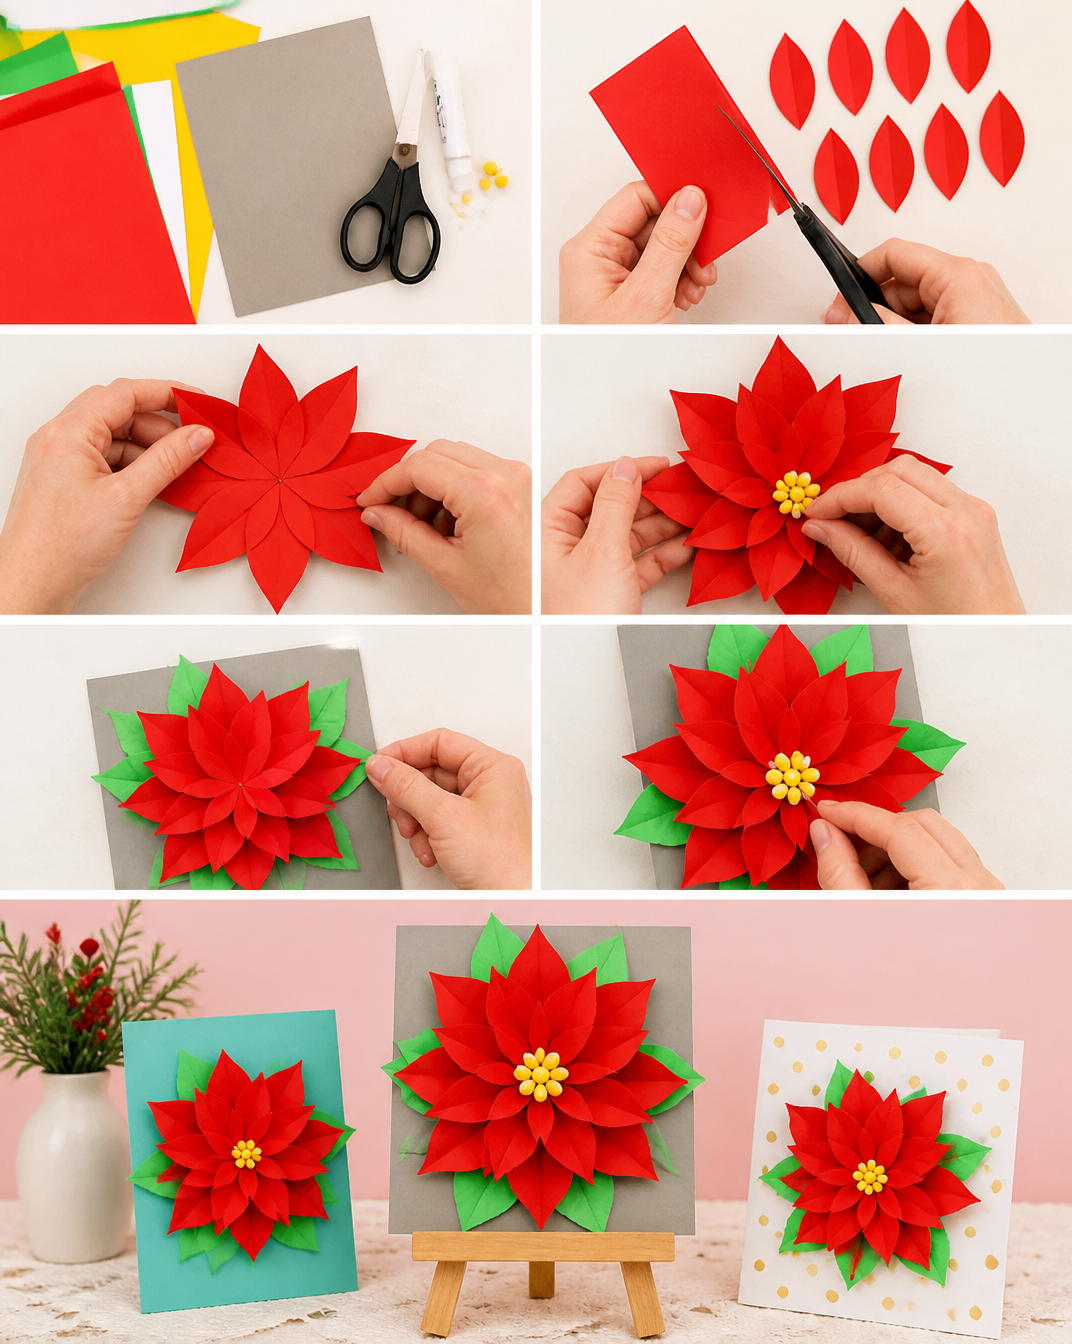
Now that you have gathered your materials and tools, let’s dive into the steps to create your Easy Poinsettia Christmas Card.
Step 1: Prepare the Card Base
Start by cutting your cardstock to your desired card size. A standard size is 5×7 inches. Fold the cardstock in half to create the card base.
Step 2: Cut Out Poinsettias
Using the red paper, sketch flower shapes. Common shapes for poinsettias are star-like petals. Cut out several of these shapes—3 to 5 flowers will work beautifully.
Step 3: Cut Out Leaves
Next, cut out leaf shapes from the green paper. You can create different sizes for added dimension.
Step 4: Assemble the Flowers
Layer the cut red petals by gluing one on top of another for each flower to create depth. If you use gold paper for the centers, cut small circles and attach them to the middle of the layered petals.
Step 5: Attach Flowers and Leaves to Card
Decide where you want to place the poinsettias on the front of your card. Glue the flowers and leaves onto the card, arranging them for a pleasing effect.
Step 6: Write Your Message
Use your markers or pens to write a heartfelt message inside the card. This step adds a personal touch that makes homemade gifts truly special.
Step 7: Final Touches
If desired, add any embellishments, like glitter or additional drawings, to complete your card. Let everything dry before handling.
TIPS AND TRICKS
- Choosing Materials: For a polished look, use quality cardstock and vibrant paper. You can even upcycle old wrapping paper or magazines for unique patterns.
- Cutting Precise Shapes: Always keep your scissors sharp to achieve clean cuts. If you’re unsure about your shapes, lightly trace them with a pencil before cutting.
- Gluing Tips: Use a glue stick for an easy application that dries clear. If using liquid glue, be sparing to prevent messiness.
- Avoiding Common Mistakes: Carefully measure and cut your card base first to ensure it folds nicely.
- Customization: Feel free to add personal touches, like the recipient’s name or a special greeting on the front.
- Making It Last: To make your card last longer, consider adding a protective coating of clear spray sealer once you’ve finished.
VARIATIONS AND CUSTOMIZATION IDEAS
- Different Colors: While red and green are traditional, feel free to use other colors like white and gold for a more modern twist.
- Different Sizes: Experiment with mini cards or large cards for varied presentations.
- Using Different Materials: Try felt instead of paper for a textured look or add fabric embellishments.
- Seasonal Versions: While this card has a Christmas theme, you can adapt the design for other holidays by changing colors and decorations.
- Patterns: Add patterns to your flowers using stamps or stencils for visual interest.
- Finishes: Instead of a flat design, create pop-up elements inside the card for a surprise effect.
- Personalization: Include photos or prints of your family and pets to make the card extra special.
Easy Poinsettia Christmas Card FAQ
Can beginners really make this card?
Yes! This project is designed to be simple and straightforward, making it perfect for beginners.
What materials do I need to make this card?
You will need cardstock, red and green paper, glue, scissors, and optionally glitter paper, markers, and a pencil.
How long does it take to complete this card?
The project typically takes about 30-45 minutes, so you can easily make several cards in one crafting session.
How should I store my finished cards?
Store them in a flat position, preferably in a box or container, to avoid bending while waiting to send them out.
Can I clean or reuse materials for this project?
Most of the materials used are single-use. However, if using felt or fabric, those can often be reused in different projects later.
CONCLUSION
The Easy Poinsettia Christmas Card is a delightful DIY craft that combines creativity with the joy of giving. It is easy to make, budget-friendly, and provides a perfect opportunity to personalize your holiday greetings. Whether for gifts, home decor, or simply to spread good cheer during the season, this project is suitable for everyone, even beginners. So gather your materials, take a few moments to craft your cards, and don’t forget to share your experience and any customization ideas with fellow crafters!