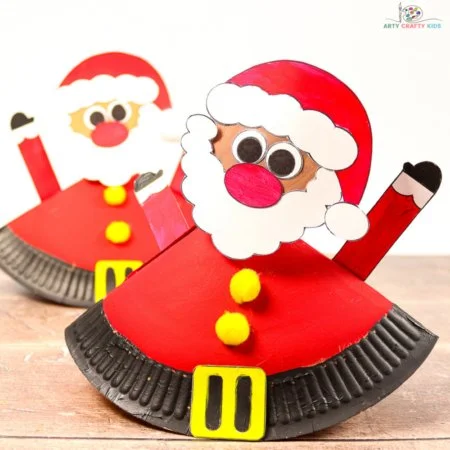
Create a delightful and festive ambiance this holiday season with the Rocking Paper Plate Santa craft. This easy and fun DIY project is perfect for beginners and can be done with simple materials you may already have at home. With just a few supplies, you can make a charming decoration that will not only brighten up your space but also serve as a budget-friendly gift for friends and family. Let’s dive into this creative DIY idea that’s sure to bring smiles!
WHY YOU WILL LOVE THIS Rocking Paper Plate Santa
The Rocking Paper Plate Santa craft is a fantastic project for various reasons:
- Easy for beginners: This craft uses simple materials and straightforward steps, making it ideal for anyone who might be new to crafting.
- Uses simple materials: You likely have most supplies at home, making it an accessible project for all.
- Budget-friendly: With minimal materials needed, this craft won’t break the bank.
- Quick to make: In under an hour, you can create your own rocking Santa, making it perfect for busy individuals or families.
- Great for home decor: This lively piece will add a festive flair to your holiday decorations, spreading cheer wherever displayed.
- Easy to customize: Personalize your Santa with different colors or designs to match your own decor style.
PROJECT DETAILS
Skill Level
Beginner-friendly – no special skills required.
Estimated Time
Approximately 45 minutes to 1 hour – quick enough for any holiday gathering!
Approximate Cost
Low-cost – most materials can be obtained for under $10.
Best For
Families, educators, or anyone looking for fun holiday crafts.
Project Type
Seasonal craft – ideal for holiday decorations or handmade gifts.
TOOLS AND EQUIPMENT NEEDED
Scissors
Used for cutting the paper plate and other craft pieces to the right shape and size.
Glue Stick
To securely attach various components of the Santa and ensure they stay in place.
Stapler
Helpful for securing folds and creating the desired shape of Santa.
Sticky Tape
Used for additional securing of the pipe cleaner and other elements.
MATERIALS
Eco Paper Plate
The foundation of this project, the paper plate will be transformed into Santa’s body.
Acrylic Paint
Used to add color to your Santa, including red for his suit and black for detailing.
Pom-Poms
These cute embellishments will serve as Santa’s buttons and decorative elements.
Pipe Cleaners
To create a playful rocking effect, adding some fun movement to your Santa decoration.
Santa Template
A printable template that offers an easy way to cut out necessary features like the hat and beard.
HOW TO MAKE Rocking Paper Plate Santa
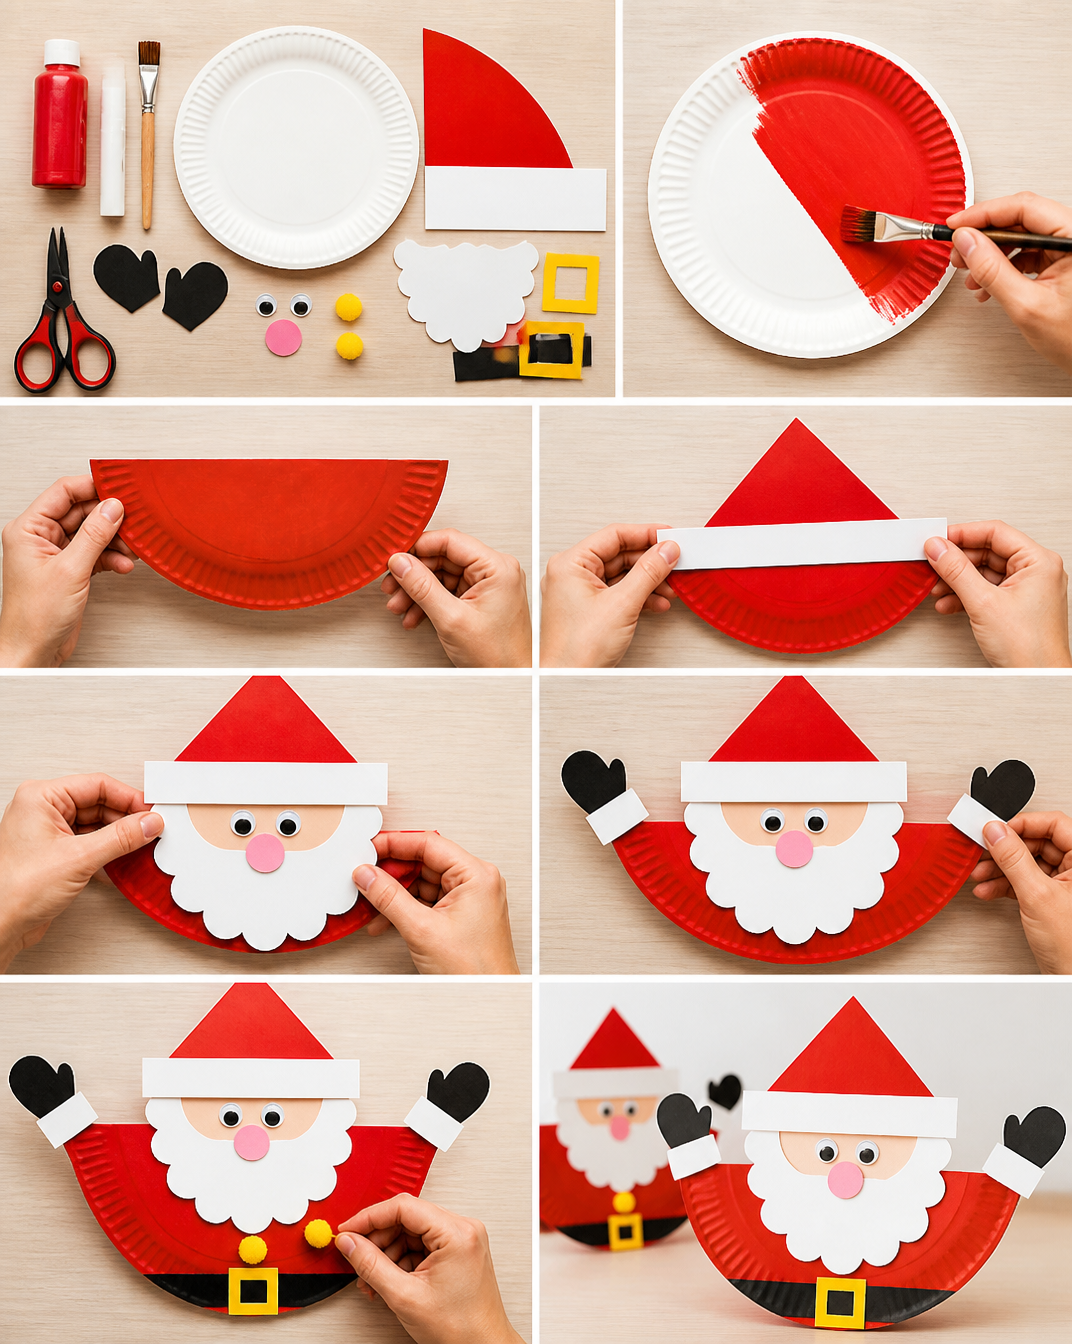
Step 1: Cut the Paper Plate
Begin by cutting a line into the center of the paper plate. This will be the base that allows it to rock.
Step 2: Create the Shape
Turn the paper plate over and cut a straight line just beyond the center point. This will help form the shape of Santa’s body.
Step 3: Fold the Plate
Gently fold the paper plate into a rounded shape to create a center point, then fold it again for an overlap, forming a more defined shape.
Step 4: Secure the Fold
Staple the fold securely to maintain the triangular shape of Santa’s body.
Step 5: Flatten the Overlaps
Make sure all overlaps are flattened and secured with staples to make a sturdy structure.
Step 6: Cut the Tip
Cut off the pointy tip of the paper plate to create a small opening at the top for the head.
Step 7: Paint the Plate
Paint the top of the plate red for Santa’s suit and the lower rim black for his belt. Allow it to dry thoroughly.
Step 8: Prepare Santa’s Features
While the paint dries, color in and cut out the Santa elements from the provided template.
Step 9: Assemble Santa’s Head
Glue the hat and beard onto Santa’s head and carefully place the nose in position.
Step 10: Add the Belt
Glue the yellow buckle and corresponding pom-poms to the plate, completing Santa’s outfit.
Step 11: Fold Santa’s Arms
Create a small flap on either side of Santa’s arms, glue them down, and attach them to the body.
Step 12: Make the Springs
Twist and coil two pipe cleaners to form springs and insert one into the top opening of Santa.
Step 13: Secure the Spring
Use sticky tape to secure the spring and adjust it for balance, allowing Santa to rock.
Step 14: Attach Santa’s Head
Finally, secure Santa’s head either to the top of the pipe cleaner or directly to the paper plate.
TIPS AND TRICKS
- Choosing Materials: Opt for biodegradable or recycled materials for a more eco-friendly project.
- Cutting Carefully: Take your time when cutting shapes to ensure neat and tidy edges.
- Glue Choices: Use a glue stick for paper attachments and hot glue for more durable securing of heavier components, especially the pom-poms.
- Avoiding Mistakes: Make sure the paint dries fully before assembling to prevent smudging.
- Finishing Touches: Add extra decorations like glitter or extra pom-poms for a unique touch.
- Storage: Store your completed crafts in a dry place to ensure they last beyond the holiday season.
- Safety First: If crafting with kids, supervise the use of scissors and glue.
VARIATIONS AND CUSTOMIZATION IDEAS
- Different Colors: Change up the colors of Santa’s suit to create a unique version, like a blue Santa.
- Themed Versions: Create a winter scene by making additional characters like reindeer or snowmen using similar techniques.
- Gift Versions: Personalize by adding names or messages on the body of Santa for a festive handmade gift.
- Sizes: Adjust the size of the paper plate to make larger or smaller versions of Santa.
- Patterns: Instead of simply coloring, use patterned paper for his clothing.
- Seasonal Ideas: Change the decorations for other holidays; use an Easter template to create a bunny!
Rocking Paper Plate Santa FAQ
Q1: How difficult is this project?
A1: This project is beginner-friendly and suitable for crafters of all skill levels.
Q2: What materials do I need for this craft?
A2: You will need an eco-friendly paper plate, acrylic paint, pom-poms, pipe cleaners, a glue stick, scissors, sticky tape, a stapler, and a Santa template.
Q3: How do I store my finished Santa?
A3: Keep your completed craft in a cool, dry place to ensure the paint doesn’t get damaged. Store it away from direct sunlight to retain its colors.
Q4: How long does it take to make the Rocking Paper Plate Santa?
A4: The craft should take about 45 minutes to an hour to complete, depending on drying times for the paint.
Q5: Can I customize Santa?
A5: Yes! You can use different colors, patterns, or even create themed versions to match your holiday decorations.
CONCLUSION
The Rocking Paper Plate Santa craft is not only an easy DIY project but also a delightful way to add some handmade charm to your holiday season. With simple instructions and budget-friendly materials, this project is perfect for crafters of all ages. Whether you are making it for your home decor or as a thoughtful handmade gift, it offers plenty of opportunities for creativity. So gather your materials, follow the steps, and let your holiday spirit shine! Don’t forget to share your experiences or your unique twists on this fun craft. Happy crafting!