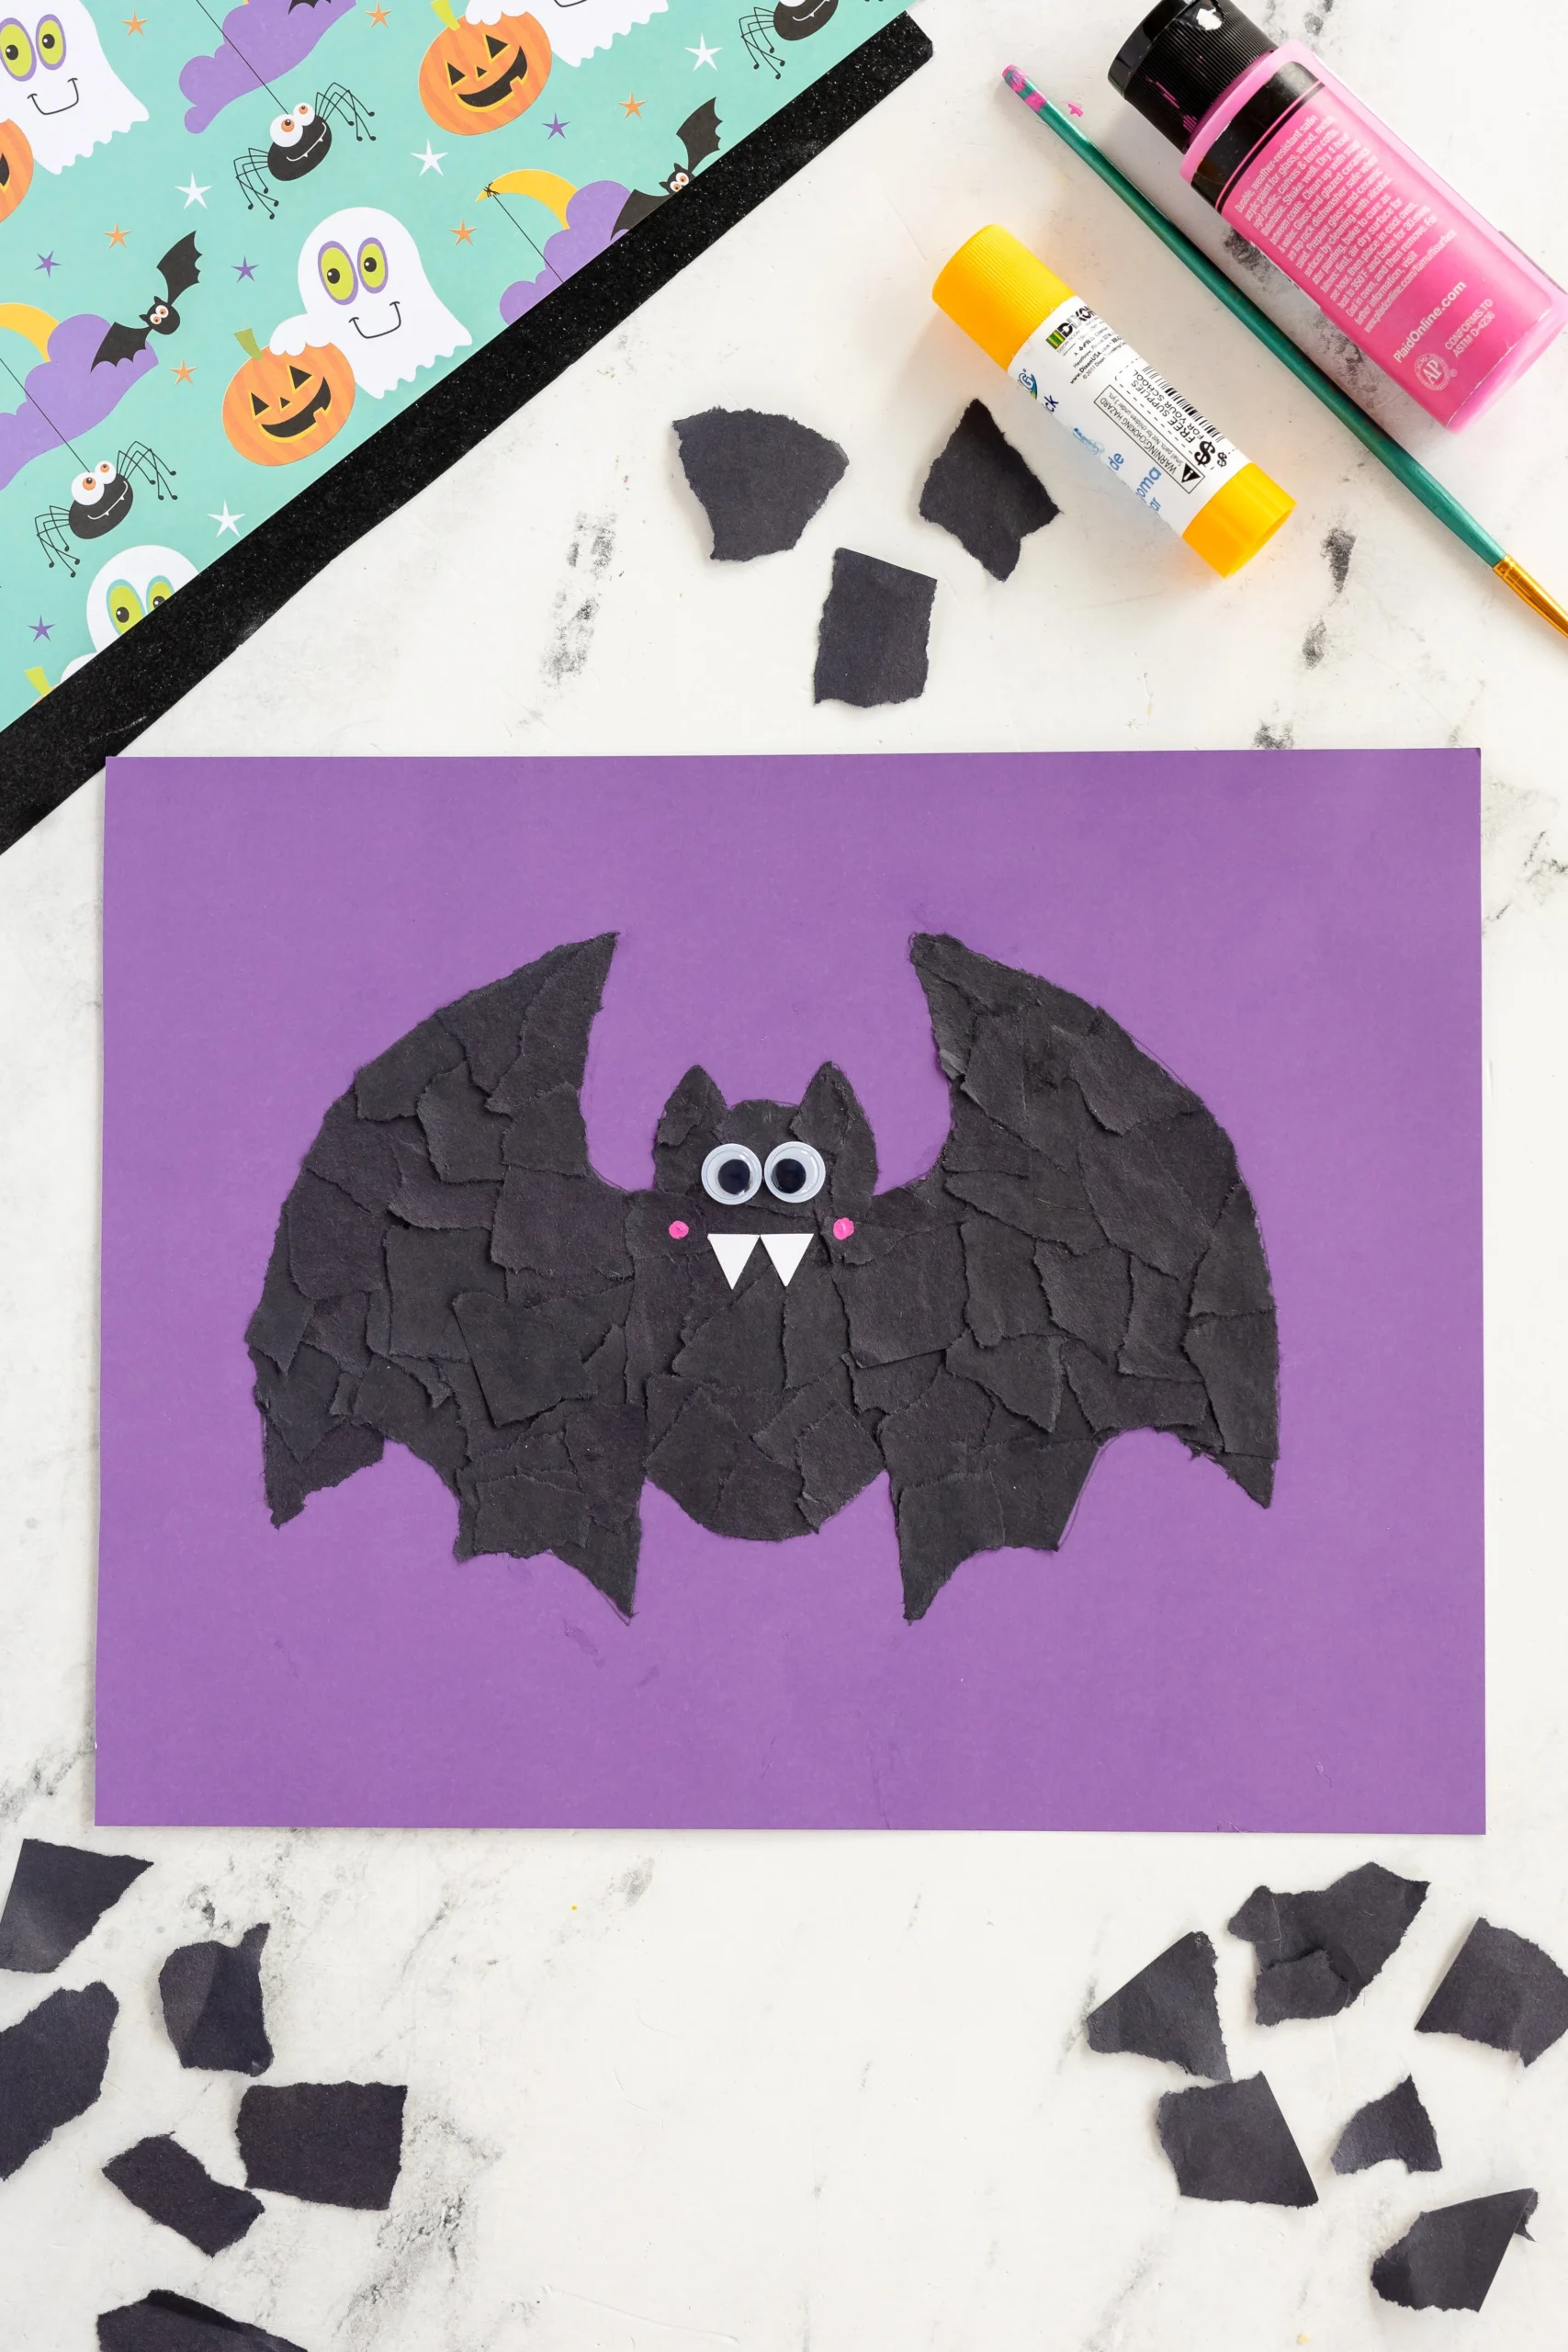
Creating a Halloween Bat Craft is an exciting and fun way to celebrate the spooky season. This easy DIY project is perfect for beginners, using simple materials that you likely already have at home. It is a fantastic way to add some homemade decor to your Halloween celebrations, making your space festive without spending a lot of money. Plus, it lends itself to various customization options, so you can truly make it your own. Let’s dive into this creative DIY project and get started!
WHY YOU WILL LOVE THIS Halloween Bat Craft
You will enjoy making this Halloween Bat Craft for several reasons:
- Easy for Beginners: This project is designed to be simple, making it accessible for crafters of any skill level.
- Uses Simple Materials: The materials are common and inexpensive, meaning you won’t have to search far or spend much to get started.
- Budget-Friendly: This craft won’t break the bank, making it a perfect choice for anyone looking for economical Halloween decor.
- Quick to Make: The steps are straightforward, and you can complete this craft in no time, making it perfect for busy schedules.
- Great for Home Decor: This craft adds a fun and spooky touch to your home during the Halloween season.
- Easy to Customize: You can personalize the bats with different colors, sizes, and designs, so each one can be unique.
- Ideal for Seasonal Decorating: These bats are perfect for hanging around your home, adding a festive flair to your Halloween atmosphere.
PROJECT DETAILS
Skill Level
Beginner
This project is perfect for those new to crafting.
Estimated Time
30 minutes
You can create several bats in about half an hour.
Approximate Cost
$10
Most materials are budget-friendly and can be found around your home or at a craft store.
Best For
Halloween decorations, DIY home decor
These bats will brighten your space and impress your guests.
Project Type
DIY Craft
A creative DIY project that anyone can enjoy.
TOOLS AND EQUIPMENT NEEDED
Scissors
Used for cutting out the bat template and cardstock shapes.
Glue
Essential for sticking the bat pieces together, providing a secure hold.
Paintbrush
Used for applying paint to give your bats cute pink cheeks.
Bat Template
A printed or drawn outline of a bat to trace onto cardstock.
MATERIALS
Purple Cardstock (8.5 X 11)
This bright color will form the main body of your bat, giving it a fun Halloween vibe.
Black Cardstock
This material is perfect for creating the bat’s wings, providing a classic spooky look.
White Cardstock
Used to create the bat’s fangs, adding character to your Halloween decoration.
Googly Eyes
These will give your bats a playful and whimsical look, making them more fun.
Pink Paint
This paint is used for the cheeks of your bats, giving them added charm.
Bat Template
A simple outline that makes it easy to create the bats, ensuring a professional look.
Glue
Standard craft glue or liquid glue is needed to assemble the different components together.
HOW TO MAKE Halloween Bat Craft
Creating your Halloween Bat Craft is simple! Just follow these easy steps:
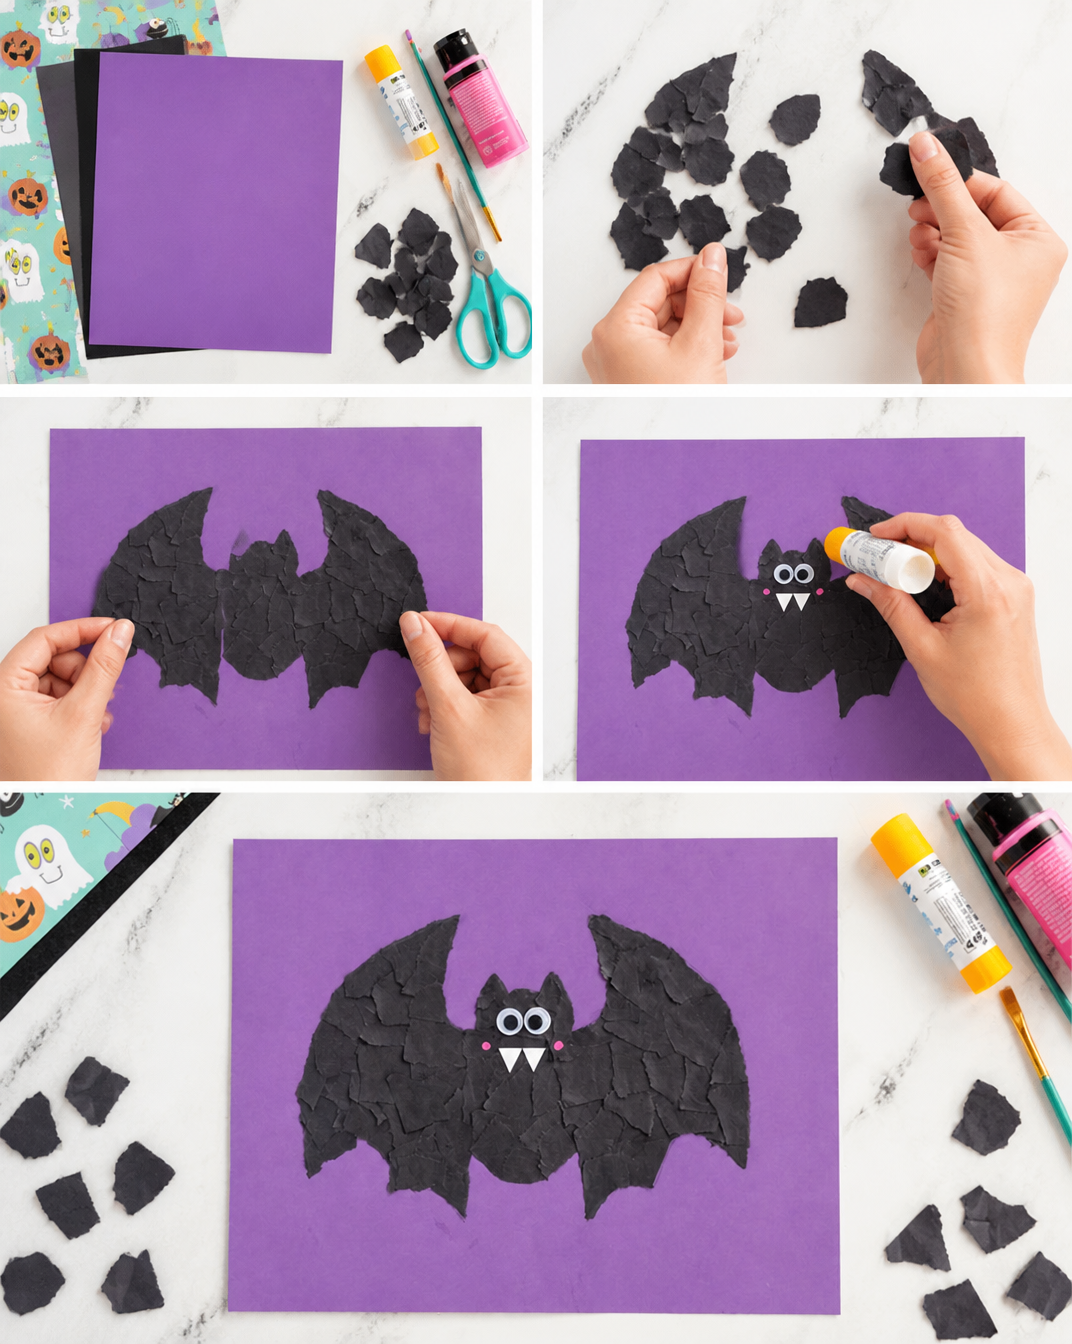
Step 1: Cut Out Your Bat Template
Start by cutting out the bat template. Use scissors to carefully trim around the edges of the shape. If you designed your bat, you can also print a template from online sources.
Step 2: Trace the Bat onto Purple Paper
Place the bat template on the purple cardstock and carefully trace around it with a pencil. Make sure it is centered on the cardstock to get a perfectly shaped bat.
Step 3: Tear Black Paper Into Pieces
Take the black cardstock and tear it into small pieces. Vary the sizes, with some small and some pointy pieces that can mimic the bat’s wings. These torn pieces will add texture to your bat.
Step 4: Glue the Black Bits Inside the Bat Shape
Using glue, attach the black paper pieces inside the outline of the purple bat. Spread them out to give a lively look, focusing more pieces on the wings.
Step 5: Add Googly Eyes
Now it’s time to give your bat some personality! Stick two googly eyes onto the purple section of the bat using liquid glue. This will bring your creation to life.
Step 6: Attach White Fangs and Pink Cheeks
To finish your bat, cut out small triangles from the white cardstock and glue them onto the bottom of the bat for fangs. Then, dip the bottom end of a paintbrush into the pink paint and dot some cheeks on each side of the bat’s face.
TIPS AND TRICKS
For a smooth crafting experience, consider these tips:
- Choosing Materials: Opt for vibrant colors that will stand out against your walls. The combination of purple, black, and white gives a classic Halloween look.
- Cutting and Gluing: Take your time when cutting the bat’s shape and tearing the black paper for a neat finish. Use a small amount of glue so that it doesn’t ooze out when pressed down.
- Avoiding Mistakes: Make sure the bat template is centered on the cardstock before tracing to ensure symmetry.
- Making the Project Easier: If you are crafting with kids, consider pre-cutting the bat shapes and black paper pieces to allow for more creativity in the decorating phase.
- Getting a Better Finish: Use a craft knife for cleaner cuts, especially for intricate areas of the bat.
- Saving Money: Repurpose leftover scraps from previous projects, such as old cards or wrapping paper, instead of buying new materials.
- Making It Last Longer: Finish with a clear spray sealant to protect your bats if they will be outdoors.
- Working Safely: Always supervise children with scissors and glue, ensuring they use them properly to prevent accidents.
VARIATIONS AND CUSTOMIZATION IDEAS
Here are several ways to customize your Halloween Bat Craft:
- Different Colors: Instead of purple, consider using orange or green cardstock for a fun twist.
- Different Sizes: You could create smaller bats for a mini decorations or larger ones to make a big statement.
- Different Materials: Use felt or fabric for a unique texture, or even metallic paper for a sparkly effect.
- Seasonal Versions: Add seasonal flair with leaves or pumpkins for Autumn or spooky elements like skulls and ghosts.
- Holiday Versions: Adapt the design for other holidays by changing the shapes’ designs and colors—think Christmas bats in red and green!
- Different Patterns: Consider using patterned paper, like polka dots or stripes, for a whimsical character.
- Personalized Versions: Add names or initials to each bat for a unique flair, making the bats personalized gifts or decorations.
Halloween Bat Craft FAQ
1. Is this craft suitable for beginners?
Yes! This Halloween Bat Craft is designed for beginners and can be completed with simple steps and easily available materials.
2. How long does it take to make the Halloween Bat?
You can expect to spend about 30 minutes creating your bats, depending on how many you decide to make.
3. What materials do I need?
You will need purple and black cardstock, googly eyes, white cardstock, pink paint, a bat template, and glue.
4. How should I store the finished bats?
Store them in a dry place, and keep them flat to avoid bending or damage. If using outdoors, consider sealing them with a clear spray.
5. Can I clean the bats if they get dirty?
If you used regular cardstock, clean them gently with a slightly damp cloth. Avoid using water on paint or paper that could be easily damaged.
CONCLUSION
The Halloween Bat Craft is a perfect seasonal project that blends creativity with fun. It is simple, budget-friendly, and an enjoyable activity suitable for crafters of all ages. With just a few materials, you can create wonderful decorations that enhance your home decor for Halloween. Don’t hesitate to customize your bats to match your style, and enjoy the festive spirit they bring. Go ahead and try this easy DIY project, then share your finished crafts and any unique enhancements you made!