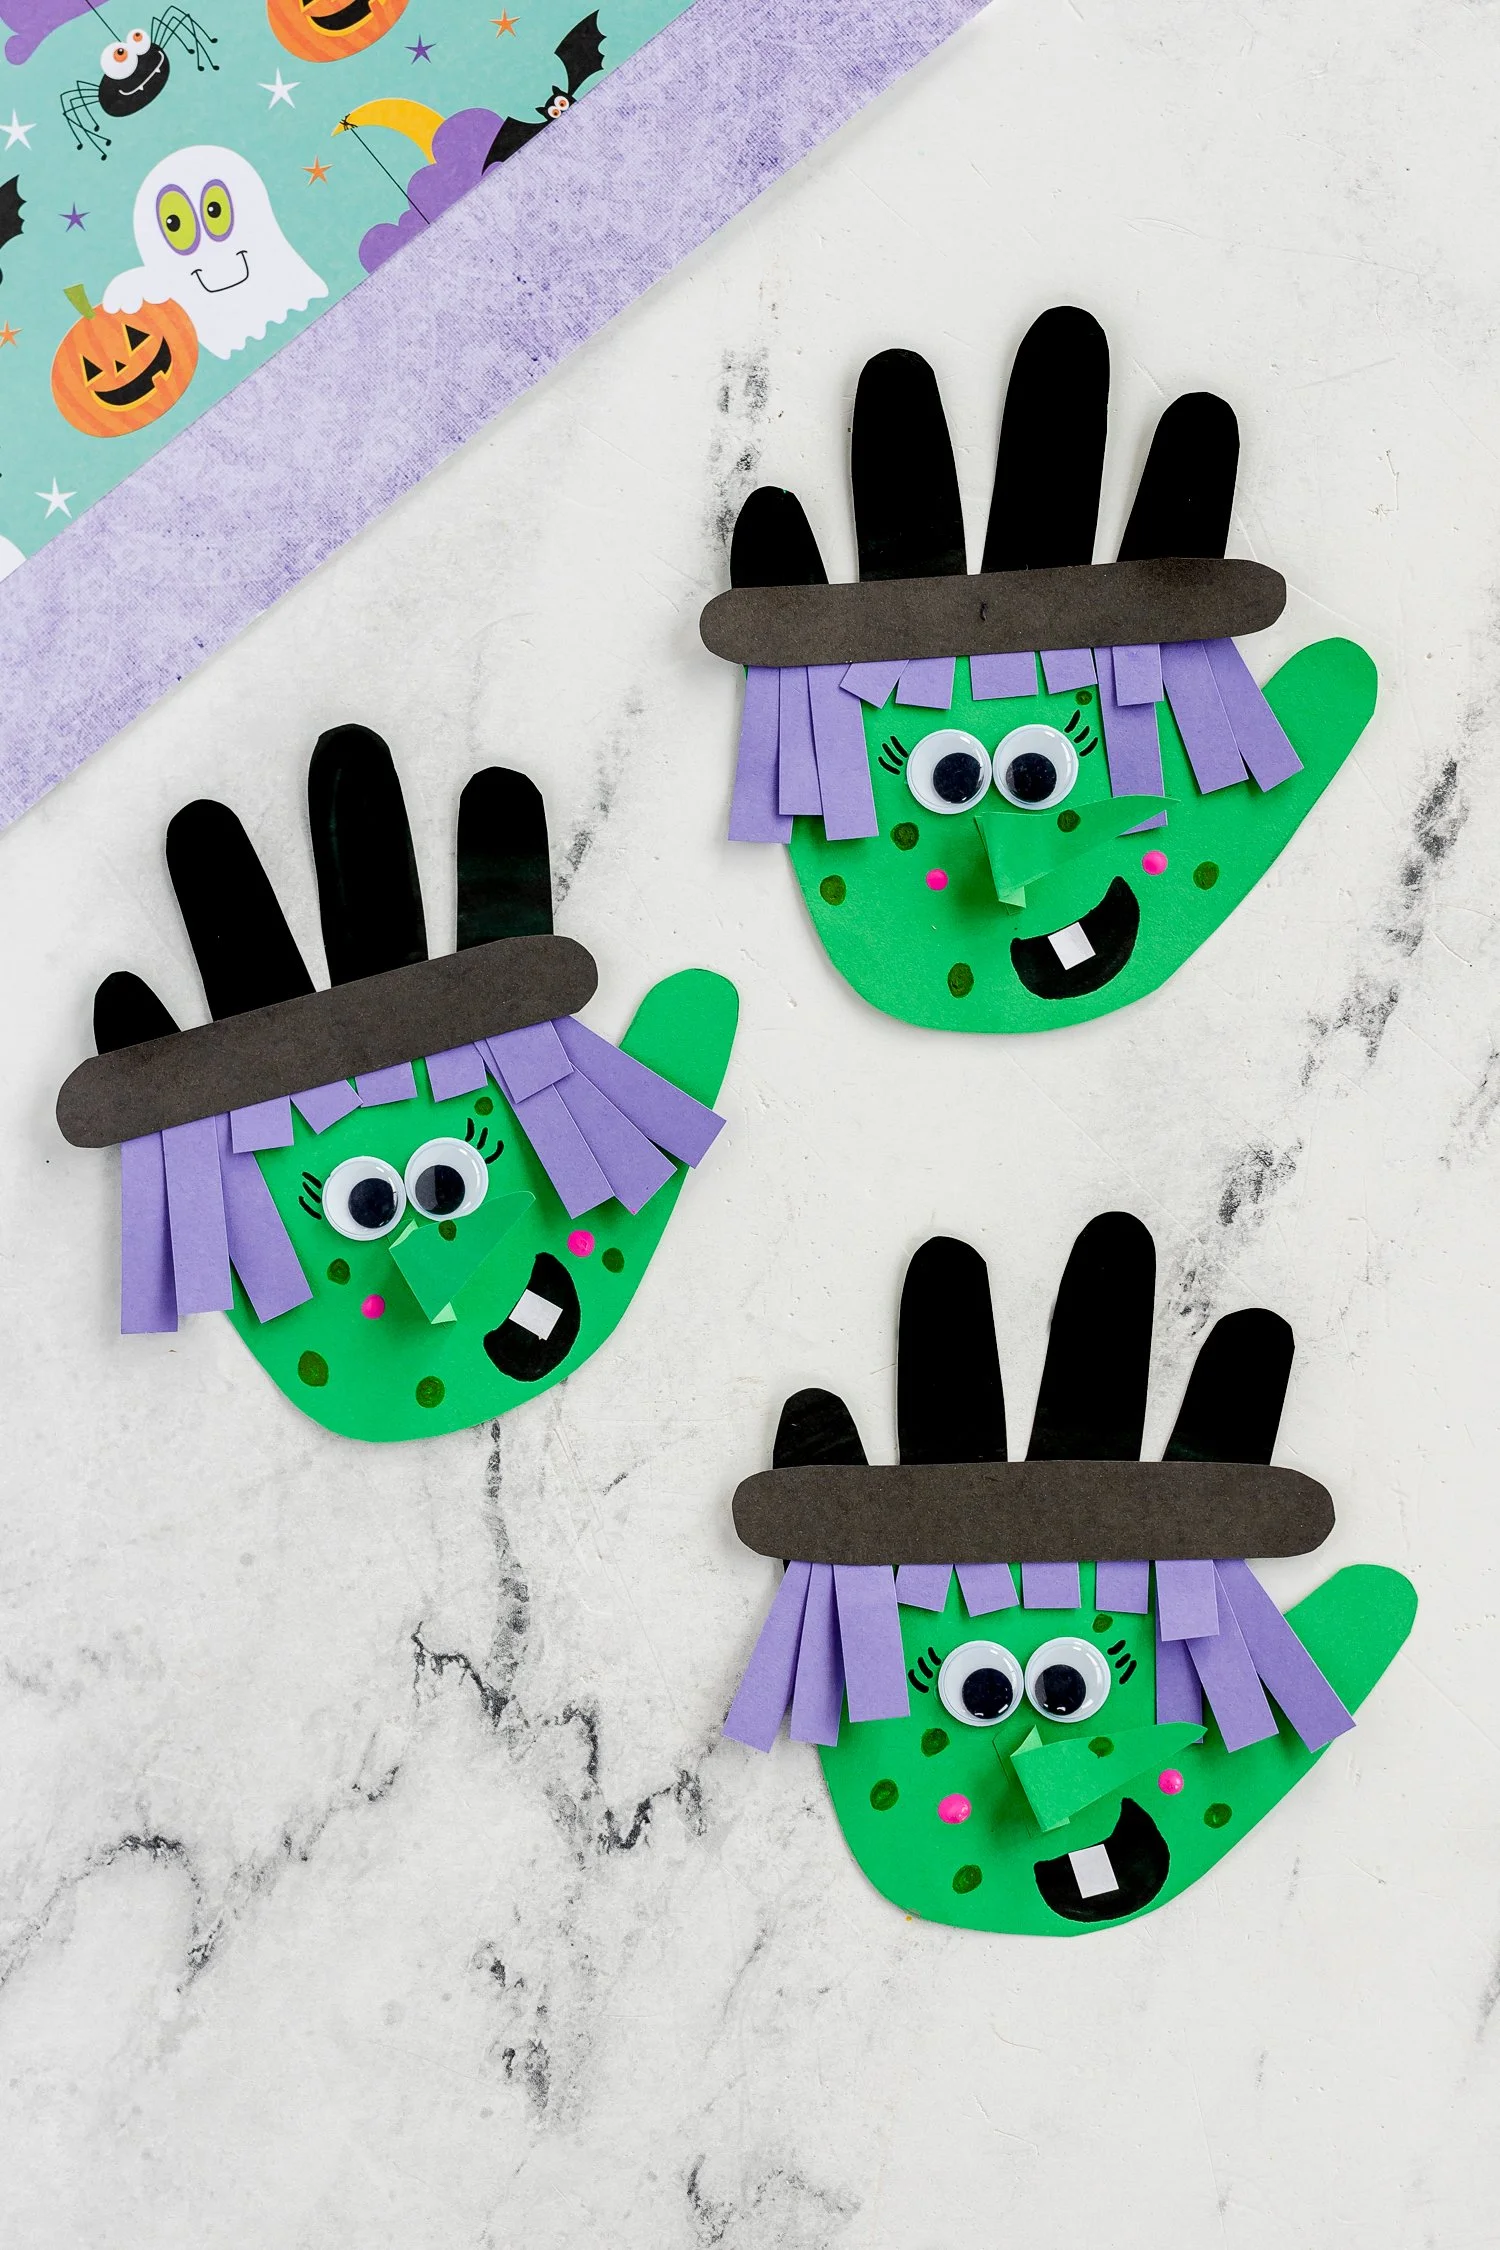
Get ready for a fun and festive Handprint Witch Craft project that is perfect for Halloween or any time you want to create something spooky yet delightful! This easy craft is an excellent choice for kids and beginners alike. With simple materials and straightforward instructions, you can make this handprint witch craft in no time. It’s a wonderful DIY project that doubles as creative home decor, seasonal decoration, or even a handmade gift. Let’s dive into this fun, budget-friendly craft that can brighten up your space and your Halloween festivities!
WHY YOU WILL LOVE THIS Handprint Witch Craft
This Handprint Witch Craft offers a variety of benefits that make it an appealing choice for both children and adults:
- Easy for Beginners: The steps are simple, making it perfect for those new to crafting.
- Uses Simple Materials: You can find most materials around the house or at your local craft store.
- Budget-Friendly: This craft is low-cost, ensuring you don’t break the bank while creating delightful decor.
- Quick to Make: You can complete the project in under an hour, making it an ideal choice for when you are short on time.
- Great for Holidays or Seasonal Decorating: This craft adds a festive touch to your home during Halloween but can also be enjoyed in other seasons.
- Easy to Customize: Personalize your witch craft with different colors or designs, allowing for endless creativity.
Now that you know why this craft is so enjoyable, let’s look at the details to get you started!
PROJECT DETAILS
Skill Level
Beginner – This craft is suitable for all skill levels, especially those who are new to crafting.
Estimated Time
30-45 minutes – This includes preparation, crafting, and drying time.
Approximate Cost
$5-$10 – Most materials are affordable and easy to find.
Best For
Kids and families – It’s a great group activity for classrooms, parties, or home.
Project Type
Crafts for beginners – Easy DIY project that encourages creativity.
TOOLS AND EQUIPMENT NEEDED
Scissors
You will need scissors to cut out shapes and strips from the cardstock and other materials.
Glue
A glue stick or craft glue will help you attach the fingers, hair, and other embellishments securely.
MATERIALS
Green Cardstock
This will be the base for your witch’s hand, creating the perfect spooky green skin tone.
Black Cardstock
Used to create the hair and the brim of the witch’s hat for a classic Halloween look.
White Cardstock
An optional background for your handprint, making it suitable for framing or displaying.
Purple Cardstock
Purple strips will be used to replicate the witch’s hair, adding a fun twist to the design.
Googly Eyes
These will bring your witch to life, adding a playful element that kids love.
Black Sharpie Marker
This marker will be used for adding face details like the smile or warts, providing a crisp look.
Pink Paint
Used for adding cheeks to give your witch a charming appearance.
Paintbrush
This will help apply the pink paint precisely where you want it.
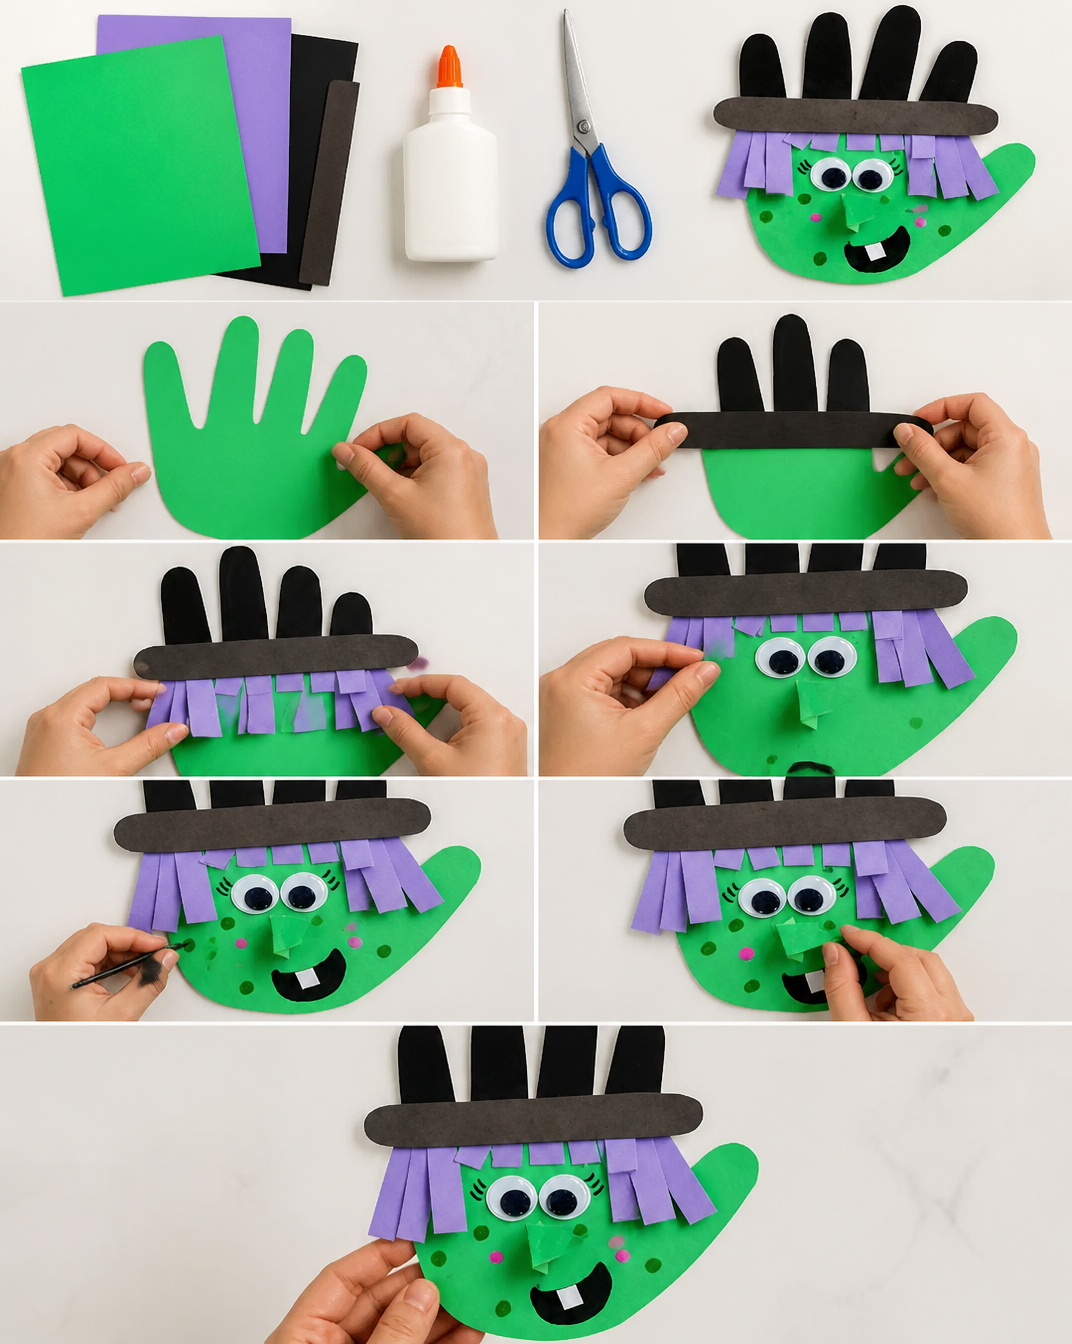
HOW TO MAKE Handprint Witch Craft
Step 1: Make Your Handprint
Begin by tracing your child’s handprint on the green cardstock. Alternatively, you can use green paint to make their handprint and place it on a piece of white paper for contrast. Let it dry if you used paint.
Step 2: Add Black Tips
Using the black Sharpie marker, color the tips of the top four fingers black to create the illusion of witches’ nails.
Step 3: Create Witch’s Hair
Cut small strips of purple cardstock. Attach these strips right beneath the black fingertips with glue, making them look like the witch’s hair.
Step 4: Make the Witch’s Hat
Cut a strip of black cardstock and glue it above the purple hair to form the brim of your witch’s hat. This adds an essential touch to your witch craft.
Step 5: Add Facial Features
Using glue, stick on googly eyes and create a crooked nose to give your witch a whimsical look.
Step 6: Draw a Mouth
With your black marker, draw a smile or an open mouth on your witch’s face to add character.
Step 7: Add Warts
Using a green marker, draw small warts on your witch’s face for that classic spooky touch.
Step 8: Paint Cheeks
Dip the hard end of a paintbrush into pink paint and dot it onto the witch’s cheeks to finish the face nicely.
TIPS AND TRICKS
- Choosing Materials: Feel free to use any color cardstock you have on hand. Mixing colors can add unique flair.
- Cutting: Ensure to use safe scissors, especially if children are involved in the crafting process.
- Gluing: Use a glue stick for easier handling and less mess compared to liquid glue.
- Finish Quality: If you want a smoother finish, try to cut the cardstock cleanly. Guide the scissors slowly for straight lines.
- Safety: Always supervise small children when using sharp tools or materials.
- Durability: To enhance durability, consider laminating the final craft or framing it after the paint has dried.
- Storage: Store your finished crafts in a dry place to prevent moisture damage.
VARIATIONS AND CUSTOMIZATION IDEAS
Customizing your Handprint Witch Craft can take it to the next level:
- Different Colors: Use different shades of green or even multicolored cardstocks to create a unique handprint witch.
- Seasonal Versions: While this project is excellent for Halloween, consider making witches in a festive color palette for other holidays.
- Add Glitter: Include some glitter on the witch’s hat or hair for a sparkly touch.
- Use Fabric: Instead of cardstock, you can create a no-sew version using felt or fabric scraps.
- Themed Witch: Create witches based on your favorite characters from books or movies by altering colors and designs.
Handprint Witch Craft FAQ
How Difficult Is This Craft?
This Handprint Witch Craft is beginner-friendly and designed for easy assembly. Anyone can complete it with simple steps and materials.
What Materials Do I Need?
You will need cardstock in several colors, googly eyes, a sharpie, paint, and glue. These materials are easy to find and very affordable.
How Do I Store My Finished Craft?
Your completed witch craft can be stored in a dry place, ideally flat or framed. Avoid damp areas to prevent damage.
Can I Wash This Craft?
This craft is primarily made from paper and cardstock. If it gets dirty, you can gently wipe it down, but it is best to keep it dry.
How Long Does It Take to Make?
The craft can typically be completed in 30-45 minutes, depending on drying time for paint.
CONCLUSION
The Handprint Witch Craft is a fun, easy craft idea perfect for anyone looking to create festive decorations or handmade gifts. With simple materials and easy steps, this craft serves as an excellent seasonal project that not only brightens your home but also encourages creativity. Whether you’re looking to add a spooky touch to your home decor or are just after a fun activity with kids, this budget-friendly DIY project promises a delightful experience. Don’t hesitate to try your hand at crafting your unique witches, and share your creations and customization ideas with others! Enjoy crafting!